Google Chrome is one of the best web browsers available out on the internet. Google Chrome provides plenty of wonderful and interesting features including extensions. Also, Google Chrome has many under the hood options to tinker with. With a little digging, you can easily modify these options to best fit your needs and requirements.
One such feature is the DNS cache. DNS (Domain Name System) cache is a small database that stores the IP (Internet Protocol) addresses of the websites you try to access. Its main purpose is to make it easier and faster to access the websites you regularly visit. Using the DNS cache, Google Chrome won’t need to fetch the IP address of the target website each and every time.
Also read: tips to increase browsing speed
If your computer has trouble reaching a certain website or server then this may be due to the corrupt local DNS cache in Chrome. Sometimes when you buy a new domain name, after hosting it on your server and changing nameservers, it takes a lot of time to propagate the DNS. Due to Chrome’s internal DNS cache system, even after you flush the DNS cache on the operating system level, the domain may still resolve to the old IP address.
Since the Chrome browser is resolving the old IP address, the website you are visiting might not work as it should.
The solution to all the above-mentioned problems is to flush out or clear DNS cache in Google Chrome browser. A DNS flush will make your computer erase any existing information regarding DNS names and IP addresses that have been stored locally. After you perform a flush, the next time you try to access a website, your computer will ask for all the new IP and DNS information related to that site resulting in an error free browsing experience.
Also read: use Google public DNS to increase browsing speed
In case you are wondering, here is how you can easily clear DNS cache in Google Chrome.
1. Clear DNS Cache in Google Chrome
- Open a new tab in your Google Chrome browser.
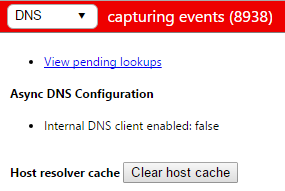
- Type in the Chrome URL
chrome://net-internals/#dnsin the address bar. - Now, click on the “Clear Host Cache” button.
- That’s all there is to do. Your Google Chrome DNS cache has now been flushed.

2. Clear DNS Cache Using Command Prompt
If flushing the DNS cache in Google Chrome still doesn’t solve the issue then you might also want to clear the Windows DNS cache. To do that, you can use the regular Command Prompt.
- Open the command prompt in Admin mode. To do that, search for Command Prompt in the start menu, right-click on it and then select the option “Run as Administrator.”
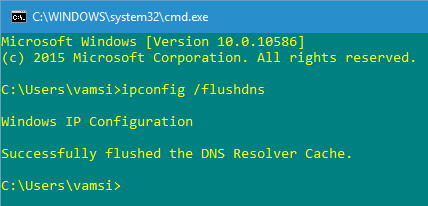
- Type in the command
ipconfig /flushdnsand press Enter. - After flushing your DNS cache, the message “Successfully flushed the DNS Resolver Cache” will be displayed on the command prompt.

That’s it. You’ve successfully cleared Windows DNS cache. If you are still facing the problem then change the DNS service. The usual DNS services provided by your ISP might not be that optimal. So, changing the DNS service might solve the problem.
Hope you found this guide useful. If you are a regular Google Chrome user then you will find these Google Chrome keyboard shortcuts cheat sheet useful. So, do check it out.
Also, comment below sharing your thoughts and experiences about using the above methods to clear DNS cache in Google Chrome.

