
If you accidentally or intentionally hid files in File Explorer, follow these steps to unhide and see hidden files in the File Explorer.
The File Explorer in Windows has a neat little feature that lets you hide almost any file or folder using the “Hidden” attribute. This attribute can be found in the file or folder properties. When you want to hide a file or folder, you just need to select the “Hidden” attribute. In fact, this is how Windows hides some important system files. When a file is hidden, it obviously won’t appear in the File Explorer.
However, there might be times when might want to unhide files in File Explorer or see hidden files in File Explorer. This is especially true if you hid a file or folder accidentally. In those cases, the File Explorer has a dedicated option called “Hidden items” that lets you unhide and see hidden files and folders.
Let me show you how to unhide and see hidden files in the file explrer.
Unhide and See Hidden Files in File Explorer
1. Open the File Explorer.
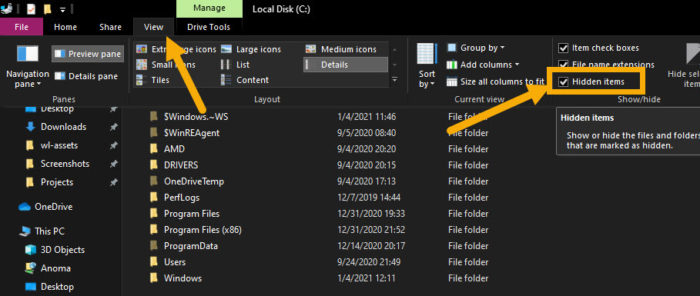
2. Click on the “View” tab at the top of the File Explorer.
2. Select the “Hidden items” checkbox.
As soon as you select the checkbox, File Explorer will show all the hidden files in that directory.
This is a universal option. i.e, enabling the Hidden Items option once will show hidden files in all folders and drives. You just need to go to the folder where you think the hidden files are. The hidden files and folders appear slightly transparent compared to other files and folders.
When you want to hide the files again, simply uncheck the “Hidden items” checkbox.
That’s it. It is that simple to unhide and see hidden files in File Explorer on Windows. If you need any further help, comment on the form below and I will try to help you as much as possible.