Android is the most feature-rich platform. It has all the options you’ll ever need to control and configure the device however you want. However, some advanced settings are buried deep down. To access them you have to install ADB shell and use it. Today, I will show you how to install ADB on Windows 10.
What is ADB
Android Debug Bridge or more widely knows as ADB shell is a command line tool that helps developers access advanced settings and debug Android apps and system settings. Besides from debugging, you can use ADB shell to back up the android device, install apps on your SD card by default, disable specific features of an app, transfer files, etc. In fact, you can even use ADB to make system level changes.
Generally, ADB is bundled with Android SDK (Software Development Kit). So, if you’ve installed Android SDK then you already have access to the ADB shell on Windows 10 with several other essential tools like Fastboot. However, if you are not a developer and don’t want to install the complete Android SDK package for just one tool that is only used occasionally then you can install ADB on Windows separately. i.e, without installing Android SDK.
Related: How to Run Android Apps on Ubuntu [Natively]
Enable USB Debugging Mode
Before installing ADB on Windows 10, you need to configure your Android device to accept the ADB commands. To do that, you have to enable USB debugging mode. Thankfully, it is very easy to do. Just follow the below instructions.
- Launch apps menu and tap on the “Settings” icon.
- Here, scroll down and tap on the option “About“.
- Now, scroll down again and repeatedly tap on the option “Build number” 7 times.
- Go back to the main Settings screen, scroll down and tap on the new option “Developer Options“.
- Here, toggle the button next to USB Debugging option. Tap on the option “Ok” in the confirmation pop-up to enable USB debugging mode.
That’s it, you’ve configured the Android device to receive ADB shell commands. You can now install ADB on Windows 10.
Related: 10 Best Secret Texting Apps for Android (Private Texting Apps for Android)
Install ADB on Windows 10
Note: the same procedure is applicable for older versions of Windows like 7 and 8.
1. To start off, download ADB for Windows from the official Google website.
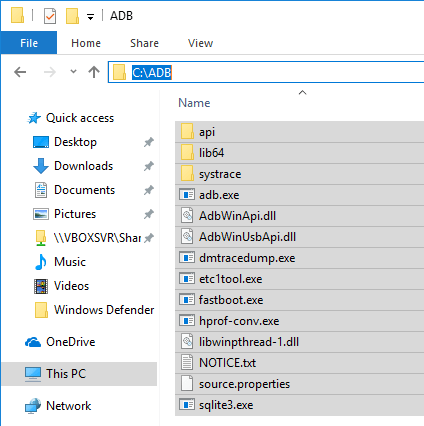
2. Create a new folder with the name “ADB” in the root of the C drive. Now, extract all the files in the downloaded ZIP file to the folder you just created. This is how it looks like when you are done extracting.
3. Grab a USB data cable and connect your android device to the Windows computer. If prompted, select “file transfer (MTP)” mode.
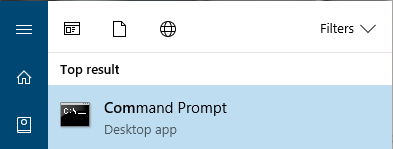
4. Now, search for “Command Prompt” in the start menu and open it.
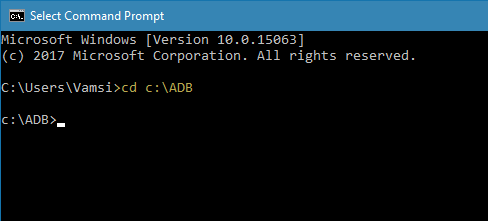
5. In the command prompt, use the below command to navigate the ADB installation folder. If you’ve installed ADB folder in some other place then change the command accordingly.
cd c:\ADB
6. Once you are here, execute the following command ADB Daemon.
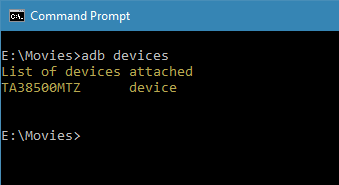
adb devices
7. As soon as you execute the command, you will see “Allow USB debugging” prompt on your android device screen. Tap on the “Ok” button. Now, your device will be listed in the command prompt.
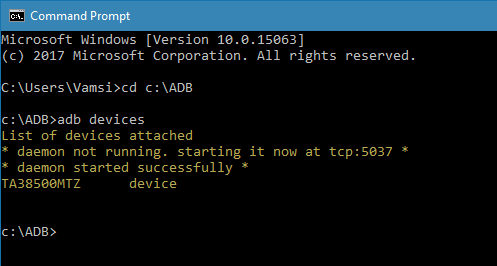
If you see your device listed then you’ve successfully installed ADB on Windows 10. If not, make sure that the device is properly connected and you have installed android drives on Windows. Generally, you can download android drivers specific to your device on the manufacturer website.
Related: How to Use Multiple Facebook Accounts on Android
Optional: Access ADB from Any Folder
As you can see, with the above method, you have to first navigate to the ADB installation folder if you want to use the ADB shell. This is not so much a problem but an inconvenience. To deal with that, you can add ADB to Windows Path. This allows you to access ADB from any folder or directory.
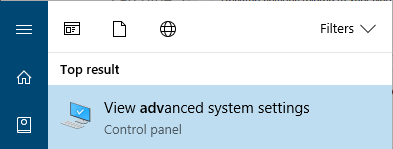
1. To add ADB to Windows path, search for “View advanced system settings” in the start menu and open it.
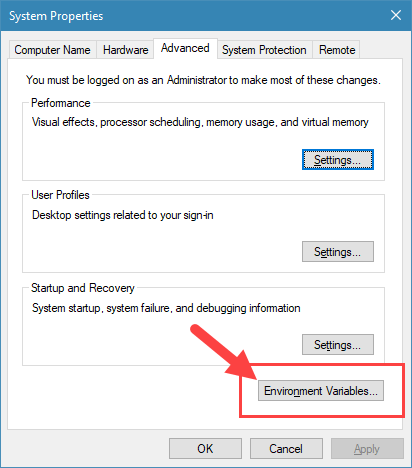
2. In this window, click on the button “Environment Variables“.
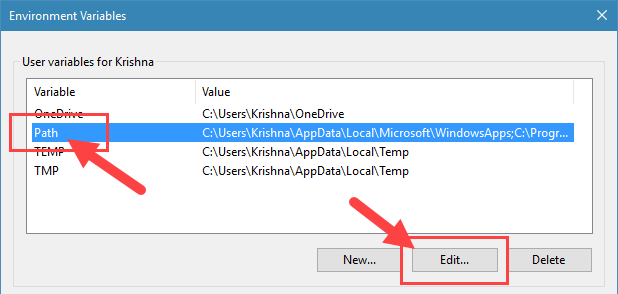
3. Here select the Path variable under “User variables for Username” and click on the button “Edit“.
Related: How To Disable Auto Media Download Feature In WhatsApp [Android]
4. Now, click on the “New” button.
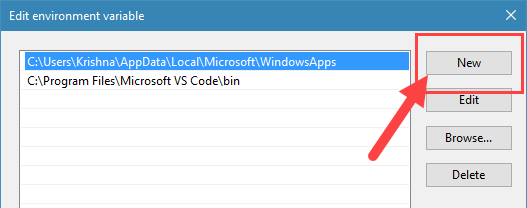
5. Enter the path to the ADB folder and click on the button “Ok” to save the changes. In my case, the folder path is C:\ADB.
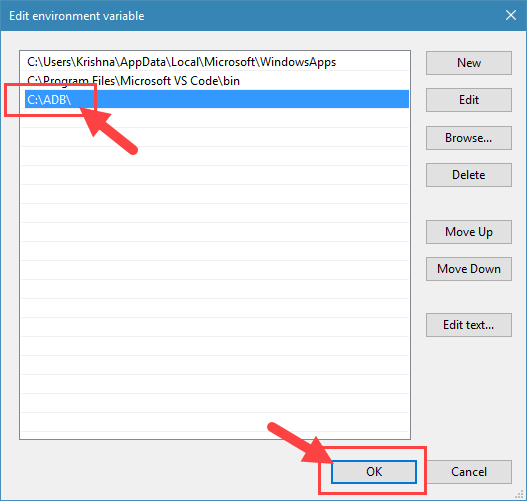
6. Click on the “Ok” on other main windows to save the changes.
From this point forward, you can access ABD from any folder. As you can see from the below image, I’m starting the ADB daemon from a folder in my E drive.
That’s all there is to do and it is that simple to install ADB on Windows 10 and add ADB to Windows path. If you find this article useful then do read how to disable volume buttons in android and how to hide audiobooks from music players in android.
Comment below sharing your thoughts and experiences about using the above method to install ADB on Windows.
Related: How to Download Android Apps to PC without Installing Any Software [Quick Tip]

