LATEST ARTICLES

How to AirDrop from iPhone to iPad

0

AirDrop is a quick, efficient way to share content across Apple devices. It uses Bluetooth to create a peer-to-peer Wi-Fi network, allowing you to transfer files without using mail or a mass storage device. Whether you’re sharing photos, documents, websites, or more, AirDrop simplifies the process. This guide takes you through the step-by-step how to AirDrop from an iPhone to an iPad, ensuring a smooth file-sharing experience.

Requirements for AirDrop

Before diving into the steps, ensure your devices meet these criteria:

  • iOS and iPadOS: AirDrop requires iOS 7 or later for iPhone and iPadOS for iPad.
  • Device Proximity: Both devices must be within Bluetooth and Wi-Fi range (approximately 30 feet).
  • Settings: Wi-Fi and Bluetooth need to be turned on, but you don’t need to be connected to a Wi-Fi network.
  • AirDrop Receiving: The receiving iPad must have AirDrop turned on and set to receive from Contacts Only or Everyone.

AirDrop from iPhone to iPad

1. Enable AirDrop on the iPad

  • Open the Control Center: Swipe down from the top-right corner on iPad.
  • Press and hold the network settings card in the top-left corner to expand it.
  • Tap AirDrop, then choose Contacts Only or Everyone. This dictates who can send files to you.

2. Prepare the iPhone for Sending

  • Ensure Wi-Fi and Bluetooth are enabled.
  • Access the file, photo, website, or content you wish to share.
  • Tap the share icon (a box with an upward arrow).

3. Start the AirDrop Process

  • From the share sheet on your iPhone, you’ll see an AirDrop section with nearby devices.
  • Tap the iPad’s name where you want to send the file.

4. Accept the AirDrop on the iPad

  • A prompt will appear on the iPad asking if you want to Accept or Decline the incoming file.
  • Tap Accept to receive the file. If sent by someone in your Contacts, it may transfer automatically.

Tips for a Smooth AirDrop Experience

To ensure a smooth AirDrop experience, keep your devices visible to each other by setting the correct visibility in AirDrop’s settings. Also, keep the devices within close proximity to maintain a strong connection. Regularly updating the software on both your iOS and iPadOS devices can also help in avoiding compatibility issues.

Troubleshooting Common Issues

If you encounter issues with AirDrop, such as it not working, no devices found, or failed transfers, here are a few steps to try:

  • Verify that both devices have Wi-Fi and Bluetooth enabled and are within range of each other.
  • Check that the receiving device’s AirDrop settings are set to receive from Everyone or Contacts Only, and ensure that the device is awake and unlocked.
  • If problems persist, try restarting both devices and check for any available software updates.

Conclusion

Using AirDrop to transfer files between an iPhone and an iPad can greatly enhance your productivity by simplifying the file-sharing process. By following the steps outlined in this guide and addressing common issues as they arise, you can make the most of AirDrop’s capabilities.

Happy sharing!

How to Install VirtualBox Guest Additions on Linux Mint

0

VirtualBox, a powerful x86 and AMD64/Intel64 virtualization software, is widely used for running multiple operating systems as virtual machines. Particularly for Linux Mint users, one of its most valuable features is the Guest Additions. This suite of utilities enhances the performance and usability of the guest systems, including better screen resolution, improved mouse pointer integration, and seamless folder sharing.

This tutorial targets users who are relatively new to VirtualBox or Linux Mint. We will guide you through the straightforward process of installing VirtualBox Guest Additions on a Linux Mint virtual machine. This enhancement is essential for a smoother, more integrated virtual machine experience, bridging the gap between your host and guest operating systems.

Preparation

Before diving into the installation process, it’s crucial to ensure that your system is ready.

  1. Check VirtualBox Version: Make sure you have VirtualBox installed on your host system. It’s essential that you’re running the latest version to avoid compatibility issues. You can check the version and update if necessary through your host system’s software update tool.
  2. Backup Your System: Although installing Guest Additions is generally safe, it’s good practice to create a backup of your virtual machine. This can be done easily within VirtualBox by taking a snapshot of your current system state.

Installation Steps

Follow these steps to install VirtualBox Guest Additions on Linux Mint:

  1. Start Your Virtual Machine: Boot up your Linux Mint virtual machine in VirtualBox.
  2. Insert Guest Additions CD Image:
    • In the VirtualBox window menu, go to Devices > Insert Guest Additions CD Image....
    • A prompt should appear within Linux Mint asking if you want to run the content. Choose ‘Run’.
  3. Install Necessary Packages:
    • Open a terminal in Linux Mint.
    • Update your package repository with sudo apt-get update.
    • Install required packages using sudo apt-get install build-essential dkms linux-headers-$(uname -r).
  4. Run the Installer:
    • Navigate to the CD directory: cd /media/$USER/VBox_GAs_*.
    • Execute the installer: sudo sh ./VBoxLinuxAdditions.run.
    • Wait for the installation to complete.
  5. Restart Your Virtual Machine: Once the installation is complete, reboot your virtual machine for the changes to take effect.

Troubleshooting Common Issues

Occasionally, you might encounter issues during the installation:

  • Missing Kernel Headers: Ensure you have the correct Linux headers installed as per step 3.
  • Installation Fails: Double-check you have the necessary build tools installed. If an error message appears, it can often provide clues.

Conclusion

With the Guest Additions installed, you should notice an immediate improvement in the performance and integration of your Linux Mint virtual machine. You can now enjoy a more fluid and responsive experience, with features like shared folders and a seamless mouse pointer. Don’t hesitate to explore more VirtualBox features to optimize your virtualization experience further.

Feel free to reach out if you have any questions or need further assistance with VirtualBox or Linux Mint.

How to Change the Owner of a Directory in Linux

0

If you’re a newcomer to the world of Linux, you may be wondering how to change the owner of a directory. This is a common task, and with a few simple commands, you can easily change the directory owner to suit your needs. In this guide, we’ll walk you through the process step by step, using a convenient command to change the owner. We’ll also show you how to modify the command if you want to specify a different user as the owner.

Determining the Current Owner:

Before you can change the owner of a directory, you might want to know who the current owner is. To check this, open your terminal and follow these steps:

Step 1: Open Your Terminal

Click on the terminal icon in your Linux desktop environment or use the shortcut Ctrl + Alt + T.

Step 2: Check the Current Owner

Use the ls command followed by the -l option to list the contents of the directory with detailed information. For example, if you want to check the owner of a directory named “mydirectory,” you would type:

ls -l /path/to/mydirectory

The command will display a detailed list of the directory contents, including the owner’s name in the third column.

Changing the Owner:

Now that you know the current owner, let’s move on to changing it using the sudo chown command with the $USER variable.

Step 3: Use the chown Command

To change the owner of the directory to your current user, you can use the following command:

sudo chown -R $USER /path/to/directory
  • sudo: You’ll need superuser privileges to change ownership, so you’ll need to use sudo before the chown command.
  • -R: This option stands for “recursive,” which means it will change the owner of the specified directory and all its subdirectories and files.
  • $USER: This is a system variable that represents your current username. It’s a handy way to change the ownership to your own user account.
  • /path/to/directory: Provide the path to the directory you wish to change the owner of.

Step 4: Execute the Command

For example, if you want to change the owner of “mydirectory” to your user account, you would run the following command:

sudo chown -R $USER /path/to/mydirectory

After entering your password (since sudo requires superuser privileges), the owner of the directory and all its contents will be updated to your user account.

Modifying the Command for a Different User:

If you want to specify a different user as the owner of the directory, you can modify the chown command as follows:

sudo chown -R new_owner:new_owner_group /path/to/directory
  • sudo: You’ll still need superuser privileges, so sudo is necessary.
  • -R: This option remains the same for recursive changes.
  • new_owner: Replace this with the username of the user you want to assign as the new owner of the directory.
  • new_owner_group: This is the group of the new owner, which is typically the same as the new owner’s username.
  • /path/to/directory: Provide the path to the directory you wish to change the owner of.

Let’s say you want to change the owner of a directory named “sharedfiles” to a user named “otheruser” and you want to keep the group ownership the same as “otheruser” too. You can use the following command:sudo chown -R otheruser:otheruser /path/to/sharedfiles

After running this command and entering your password, the owner of the “sharedfiles” directory and all its contents will be updated to “otheruser,” and the group ownership will also be set to “otheruser.”

Verifying the Change:

To double-check that the owner has been changed, you can use the ls -l command again as we did in the first step. It should now display the new owner’s name in the third column.

Congratulations! You’ve successfully changed the owner of a directory in Linux using a straightforward command. This is a handy skill to have, especially when working on multi-user systems or managing various files and directories. Just remember to use the chown command with caution, as improper ownership changes can affect your system’s functionality.

How to Unhide and See Hidden Files in File Explorer

0

If you accidentally or intentionally hid files in File Explorer, follow these steps to unhide and see hidden files in the File Explorer.

The File Explorer in Windows has a neat little feature that lets you hide almost any file or folder using the “Hidden” attribute. This attribute can be found in the file or folder properties. When you want to hide a file or folder, you just need to select the “Hidden” attribute. In fact, this is how Windows hides some important system files. When a file is hidden, it obviously won’t appear in the File Explorer.

However, there might be times when might want to unhide files in File Explorer or see hidden files in File Explorer. This is especially true if you hid a file or folder accidentally. In those cases, the File Explorer has a dedicated option called “Hidden items” that lets you unhide and see hidden files and folders.

Let me show you how to unhide and see hidden files in the file explrer.

Unhide and See Hidden Files in File Explorer

1. Open the File Explorer.

2. Click on the “View” tab at the top of the File Explorer.

2. Select the “Hidden items” checkbox.

unhide and see hidden files in file explorer

As soon as you select the checkbox, File Explorer will show all the hidden files in that directory.

This is a universal option. i.e, enabling the Hidden Items option once will show hidden files in all folders and drives. You just need to go to the folder where you think the hidden files are. The hidden files and folders appear slightly transparent compared to other files and folders.

When you want to hide the files again, simply uncheck the “Hidden items” checkbox.

That’s it. It is that simple to unhide and see hidden files in File Explorer on Windows. If you need any further help, comment on the form below and I will try to help you as much as possible.

Chrome Easter Egg – Play T-Rex Game When Chrome Browser Is Offline

Besides being a search engine giant, Google is known for its hidden easter eggs and awesome April fool jokes. Recently, Google embedded a hidden easter egg right in the Chrome web browser using which you can play an awesome endlessly running T-Rex game that jumps through the cactus hurdles. This will be a killer game with endless fun when you are using public internet hotspots like the coffee shops whose internet service is just patchy and unreliable. To Google’s credit, the game is included in both the mobile and desktop platforms. However, you can only access this easter egg or the inbuilt game while your Chrome browser has no internet access. In case you are wondering, here is how you can access and play this fun little game in your Chrome browser. On Android? Here’s how to play the Chrome T-Rex game in Android phone.

Play T-Rex Game in Chrome Browser

To play the included T-Rex game, your Chrome browser should have no internet access. So I recommend you to either disconnect your system from the internet or just put it in Airplane mode. Depending on your operating system, the procedure to put your system into Airplane mode will be different. However, if you are using Windows 8/8.1, then you can easily put your system into Airplane mode by clicking on the Network icon in the taskbar and toggling the Airplane Mode switch. chrome-trex-game-airplane-mode 
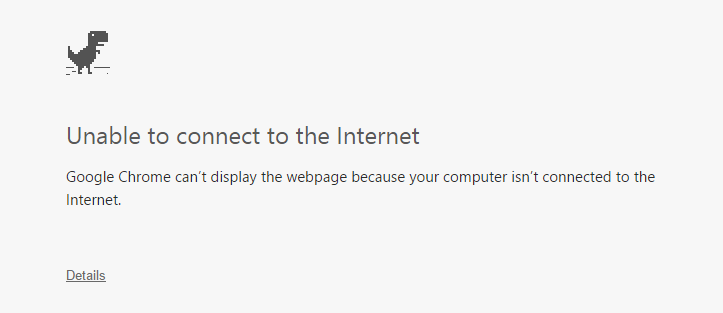
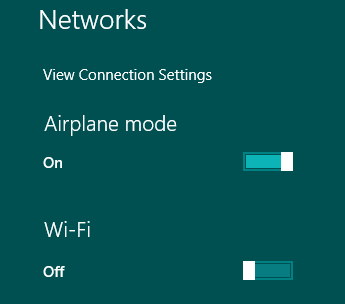
Once in offline mode, open up your Chrome browser and try to access any website of your choice. This action will result in an “Unable to connect to the Internet” error page. chrome-trex-game-unable-to-connect While you are on this page, simply hit the Spacebar on your keyboard to launch the game. If you are using a Mobile device, then tap the lonely Dinosaur to start the game. Once launched, repeatedly hit the spacebar to jump over the obstacles. chrome-trex-game-play 
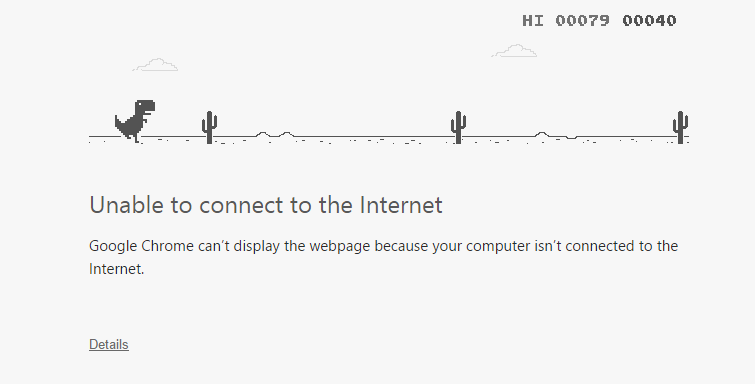
As you proceed through the game, the speed of the game increases and it will be quite a challenge to follow on. If you hit an obstacle, the game will be over. If you want to restart the game, just hit the spacebar again and you are good to go. chrome-trex-game-restart 
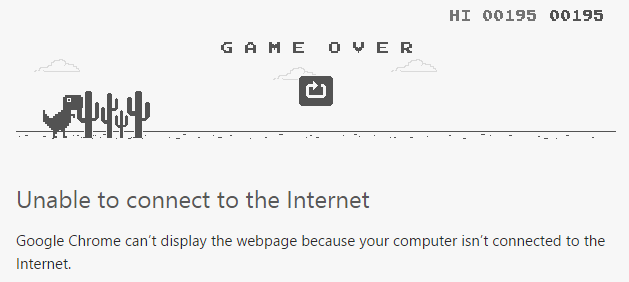
Just like in any other game, the T-Rex game does have the in-game score and you can find it in the upper right corner of the game screen. However, the scores are only saved for the active session, i.e. if you close the Chrome window, the scores will be deleted from the cache. That’s all there is to do and it is that simple to access the hidden easter egg in the Chrome browser. Even though the game is nothing special, it provides a fun way to spend idle time in case you cannot connect to the internet. Hopefully, that helps and do comment below sharing your thoughts and experiences on this fun little easter egg by Google in the Chrome browser. Have you played the lonely T-Rex game yet?

How to Enable Tab Groups in Edge Chromium Browser

0

This post shows the simple way to enable tab groups in Microsoft Edge browser. Once enabled, you can group tabs to better organize browser clutter.

Microsoft Edge can deal with many open tabs. However, after quite a few tabs, it rapidly gets hard to oversee and harder to monitor them. 

Tab Groups is another element that permits you to group tabs for better organization. Tab Grouping is disabled by default and you need to enable it via flags to turn it on and enable Tab Groups in Edge. 

In this guide, you’ll get familiar with the means to enable and utilizing Tab Groups to more readily oversee and organize your open tabs on the Chromium Microsoft Edge on Windows 10.

How to enable Tab Groups on Microsoft Edge

Open Microsoft Edge.

Type the following path in the address bar and press Enter:
edge://flags/#tab-groups

Under the “Tab Groups” section, use the drop-down menu on the right and select Enabled (or Disabled to turn the feature off).
Tab Groups optionTab Groups option

Click the Relaunch button.

Once you complete the steps, you can start creating groups to better manage your open tabs.

How to use Tab Groups on Edge

Use Tab Groups on Edge:

Open Microsoft Edge.

Open some websites.

Right-click a tab and select the Add to new group option.
Add to new group option

Click the colored circular button to customize the group.

Specify the name of the group of tabs. For example, News, Videos, Research, etc.
Microsoft Edge tab group settings

Select the color to better identify the group.

Right-click other tabs and select the Add to existing group menu and choose the group you want to add the tab.

Right-click a tab and select the Add to new group option to create another group.

After you complete the steps, you’ll have better control and organization over your open tabs.

When using Tab Groups, you’ll drag and drop tabs around to maneuver them to a different group, otherwise, you can right-click a tab and choose the increase existing group menu and choose the group you would like to maneuver it.

If you do not need the tab during a group, right-click the tab and choose the Remove from Group option. To get rid of all the tabs, click the colored dot and choose the Ungroup option, or Close group to shut all the tabs. Otherwise, you can always close each tab individually.

If you don’t just like the current order of the groups, you’ll click and hold the colored dot icon to rearrange the order of the groups within the window.

While Tab Groups may be a useful feature to manage open pages, remember that the feature is merely available during the present session, once you shut and reopen Microsoft Edge, the groups are going to be removed.

5 Best Desktop Email Clients to Effectively Manage Email Accounts

0
Emails are born before the internet and they are still the primary means of communication when it comes to important things on the internet. Due to the importance attributed to emails, most of us use multiple email accounts with multiple services like Gmail, Yahoo, Outlook, GMX, etc. For instance, you can use different emails account for different purposes like banking or financial emails, personal emails, work-related emails, subscriptions, casual or not-so-important emails, etc. While having different email accounts for different purposes is a better way to categorize and maintain incoming messages, it has its downsides. Some of the downsides include but not limited to, remembering a ton of passwords, checking multiple email accounts individually, clearing inbox clutter in multiple email accounts, etc. This is just time-consuming and who wants to go through all the hassle each and every day? Especially when you have a better way to manage and maintain all your email accounts right from your PC using desktop email clients. So without further ado, let us get to know some of the best desktop email clients that actually work.

Best Desktop Email Clients

1. Mozilla Thunderbird

There is no other email client that can beat Thunderbird when it comes to features, aesthetics, and security. In fact Thunderbird more features than most of the other premium and free desktop email clients. One of the lovable things about Thunderbird is that it is open-source and has some interesting features like intelligent spam filters, built-in RSS reader, news feed, quick search, HTML email formatting, etc. If you want to, you can get Thunderbird in portable format via PortableApps. This is very useful if you want to install Thunderbird on a USB stick and carry it with you so that you can get access to all your emails no matter what PC you are using. Simply put, Thunderbird is the best email client you could get for free, nothing beats it. Using Thunderbird? Must Read: How to backup Thunderbird on Windows 10.

Pros of Thunderbird (Features)

  • Easy email accounts setup wizard.
  • Tabbed interface.
  • Attachment reminder that reminds you to attach a file in case you forgot.
  • Customize email experience with lots of add-ons and extensions.
  • Quick search and search tools with advanced features.
  • Air-tight security and built-in phishing protection.
  • Activity Manager that records all the interactions between Thunderbird and your email provider.
  • Multiple-channel chat support for Facebook, Twitter, XMPP, IRC, etc.
  • Ability to share large files using thunderbird file link.
  • Smart folders.
  • Add-ons manager.

Cons of Thunderbird

  • Though the user interface is pretty functional, it looks a bit dated.
  • Thunderbird still relays on Mozilla’s older Gecko engine.
Platform support: Thunderbird support Windows, MacOS, and Linux. Pricing: Thunderbird is completely free. Related: Top 7 Free File Sync Software to Sync Files between Folders

2. PostBox

PostBox is just a simple and beautiful premium email client with awesome features and security. PostBox is actually ported from Thunderbird and it more or less looks like Thunderbird. But PostBox has more features and the user interface is engaging. Some of the best features of PostBox includes Dropbox support, better Gmail integration, management of attachments, improved social connections, automatic tagging, summarized replies, etc. If you don’t mind spending a few bucks than PostBox will be a perfect choice as your desktop email client for your daily usage.

Pros of PostBox (Features)

  • Better integration with Gmail.
  • Support for threaded conversations.
  • Innovative and no-nonsense user interface.
  • Supports document and image views.
  • A quick search and quick reply options to increase productivity.
  • Better integration with social networks and cloud storage services like Dropbox, Google Drive, OneDrive, Box, etc.
  • Support for placeholders in response templates.
  • 70+ professionally written email response templates.
  • Support proper image scaling and message size indicator.
  • Support for Emojis and add-ons.
  • Global and real-time filtering.
  • Support for tagging and cloud file sharing.

Cons of PostBox

  • No support for the left to right languages.
  • No free version.
Platform support: PostBox supports both Windows and MacOS. Unfortunately, there is no Linux version. Pricing: You can get PostBox with a one-time purchase of $28. There is a free trial to test drive the application. Related: Top 6 Free Snagit Alternatives to Take Screenshots

3. Newton Mail

Newton Mail is one of the best, cross-platform, and pricy email client on this list. The good thing about Newton Mail is that it is very good looking and has a carefully thought-out user interface that makes it very satisfying to use. Not to mention, Newton has some of the best-advanced features compared to other email clients. Newton Mail better integrates with your email service provider and supercharges how you use the email client for your daily communications. So, if you are looking for an eye-candy and professional looking email client and don’t mind paying yearly subscription fee the Newton Mail is for you.

Pros of Newton Mail (Features)

  • Simple, beautiful, and elegant user interface.
  • Built-in support for read-receipts so that you can know whether your email is opened or not. This feature is supported on both desktop PC and mobile.
  • Ability to schedule and send emails at a later time.
  • Tidy inbox feature that weed out not-so-important emails like newsletters.
  • Ability to snooze emails so that you can deal with the email as and when needed.
  • Ability to get useful insights about the sender.
  • Newton Mail supports many connected apps like Evernote, OneNote, Pocket, Trello, Salesforce, Asana, Todoist, etc.
  • Ability to unsend emails that you sent accidentally or emails that have typos, missing attachments, and other errors.
  • Newton Mail is available in Microsoft Store for Windows 10 users.

Cons of Newton Mail

  • Since Newton Mail heavily emphasis on its clean user interface, many of the advanced features are tucked deep in menus.
  • Unlike PostBox desktop email client, there are no dedicated email templates.
  • You need to pay yearly subscription fee to keep using Newton email client.
Platform support: Newton Mail supports Windows, MacOS, Android, and iOS. Newton Mail also supports Android Wear and Apple Watch. Pricing: Newton Mail costs you $49.99 per year. The subscription gives you access to Newton Mail on all supported device platforms. Related: How to Automatically Delete Previous Windows Installation Files in Windows 10 [Windows.old Folder]

4. eM Client

eM Client packs quite a punch with its powerful features and eye-candy design. eM Client easily integrates with all your email accounts and getting started with this desktop email client is quite easy. Some notable features include HTML formatting, remote mail viewer, mailbox encryption, advanced email management, mass email, delayed send, custom templates, quick text, support for tags, custom contact views, easy search, communication support, file transport support, etc.

Pros of eM Client (Features)

  • Ability to import emails from Outlook, Outlook Express, Thunderbird, Windows Live Mail, etc.
  • Fully optimized touch support.
  • Quick search to find your emails.
  • PGP encryption support.
  • Built-in calendar, chat, and contacts support.
  • Duplicator tool.
  • Customizable widgets.
  • Ability to schedule messages.
  • Conversation view.
  • Email Encryption.
  • Advanced email rules management.

Cons of eM Client

  • eM Client is not cross-platform.
  • The free version limits you to only use two email accounts.
Supported platforms: Windows only. Pricing: eM Client is free personal use but limits you to only two accounts. To remove the limit, you can purchase the pro version for a one-time fee of $49.95. Related: Best Play Store Alternatives

5. Mailbird

Mailbird is a no-nonsense and simple yet powerful desktop email client with a clean user interface. The most interesting thing about Mailbird is that it has all the power features (just like in outlook and Thunderbird) that you’ll ever need out of the box. Simply put, Mailbird offers a fast and solid email experience without you messing with any settings.

Pros of Mailbird (Features)

  • Easily integrates with all the existing email providers including Google Apps.
  • Clean and uncluttered user interface.
  • Integrated messaging apps like WhatsApp.
  • Integrated task management apps like Todoist.
  • Unified email box to interact with all your emails in one place.
  • Built-in calendar support.
  • A wide range of customization options.
  • Veetrooms feature for business meetings.
  • Attachment previews.

Cons of Mailbird

  • The free version is limited to 3 accounts and lacks advanced features like the unified inbox.
Platform support: Windows only. Pricing: You can get Mailbird for free but it is limited in terms of features and how many emails accounts you can add (currently limited to 3 email accounts). The pro version costs you $1.5 per month or $59 for the lifetime subscription. Related: How to Save Emails as PDF in Windows Related: Best Notepad Tricks for Windows

Conclusion

Desktop email clients are a better way to manage your email accounts and conversation as they provide a unified user interface right in your PC without any extra clutter or advanced settings. So, if you have multiple email accounts then do consider using some sort of desktop email client as it increases your productivity by reducing the time you spend on managing all your email accounts individually. So, which desktop email client are you using? Have I missed your favorite desktop email client? Do share your thoughts and experiences using the comments form below.

SOLVED: ‘Establishing Secure Connection’ Problem in Chrome

0
Recently, when I was browsing the Internet using my Chrome browser, the browser started acting weird. I could connect to any website that is not secured with SSL but couldn’t connect to any site that is secured with SSL. What’s happening is that whenever I try to access a site that has been secured with the SSL, Chrome will get stuck at “Establishing Secure connection” phase and shows a timed out error ERR_CONNECTION_TIMED_OUT eventually. To put it into perspective, I couldn’t connect to Google, Facebook, Twitter, or any other site that has https:// in the URL because of this problem. But I have no problems whatsoever in accessing all those secure sites using other browsers like Firefox, Internet Explorer, and Opera. So, like any Windows user, I thought a simple restart would do that trick and I could use the Chrome browser normally. Related: fix downloading proxy script error in Chrome When I restarted, sure enough, I was able to connect to almost all the secure sites. But after a few minutes, the problem “Establishing Secure Connection” error has reappeared in the Chrome browser. So, I did some research and found out that Jonas Lieb has also faced and solved the same problem a couple years back.

What is the Problem

It turns out that the actual culprit in my situation is the installed Comodo Firewall. Whenever the Chrome browser is trying to access a secure site, it tries to read a lot of certificate files located in different locations. A couple of such files are issuers.sst and subjects.sst created by Comodo Firewall at the location C:\Users\UserName\AppData\LocalLow\COMODO\CertSentry\. These are the files that are conflicting with the Chrome browser. Even though you can delete these files by simply pressing the delete key on your keyboard, they will be automatically created in a few moments by Comodo using the DLL file certsentry.dll. Even if you uninstall the Comodo software, the files may not be removed completely from your computer. So, here is how you can fix Establishing Secure Connection error in chrome. Related: Top 7 Free File Sync Software to Sync Files between Folders

Solving or Fixing Establishing Secure Connection Error in Chrome

Fixing Establishing Secure Connection error in Chrome is easier that you think. First off, Uninstall the Comodo Firewall or any other Comodo product from your PC. To do that, press “Win + X,” and select the option “Programs and Features.” If you are using Windows 7 or Vista, search for “add or remove programs” in the start menu. establishing-secure-connection-programs-features
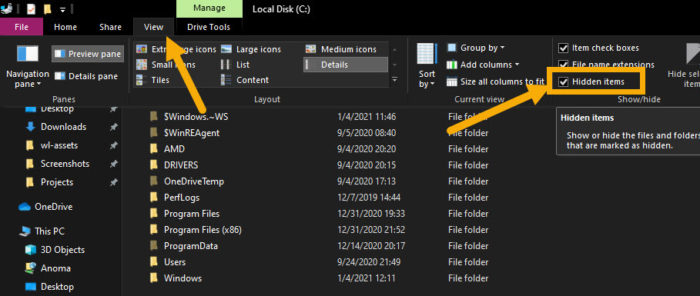
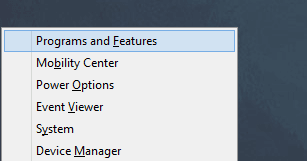
This action will open the “Programs and Features” window. Here, find the Comodo Firewall application, right-click on it and select the option “Uninstall.” Now follow the on-screen instructions to completely uninstall Comodo. Optionally, you can run CCleaner to clean any leftovers. establishing-secure-connection-uninstall-chrome 
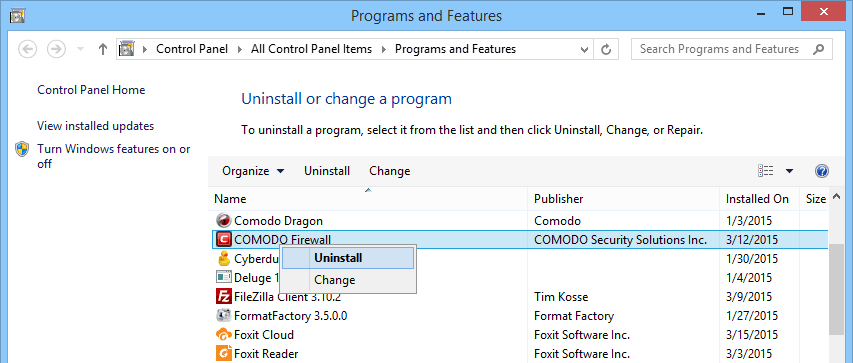
Now open the Windows file explorer and navigate to the folder
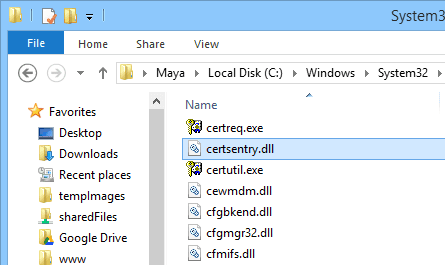
 C:\Windows\System32\. Here, scroll down and find the DLL file certsentry.dll. establishing-secure-connection-find-dll-file Related: Top 11 Best Dark Themes for Google Chrome [2018] Once you found the file, right-click on the file and rename it something else. For instance, I’ve renamed it to certsentry.dll.bkp. Since the file doesn’t belong to Windows, you can even delete the file, if needed. Moreover, to modify any system file, you first need to take ownership and full permissions of that specific file. establishing-secure-connection-rename-dll 
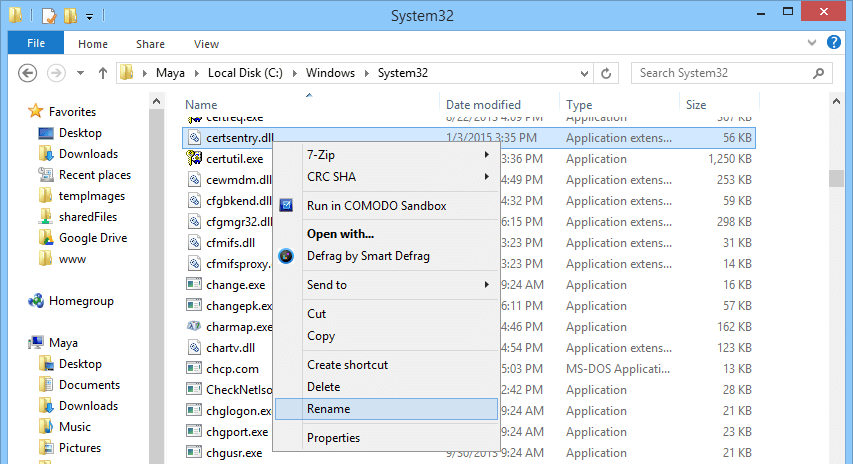
Once renamed, the file will look something like this. Related: All Essential Google Chrome Keyboard Shortcuts – PDF Download [Free] establishing-secure-connection-dll-file-renamed 
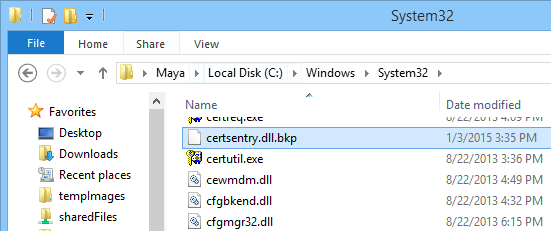
After renaming the file, navigate to the folder C:\Users\UserName\AppData\LocalLow\COMODO\CertSentry\ and delete both the files issuers.sst and subjects.sst. If you want, you can delete the entire COMODO folder. Note: the AppData folder in Windows is hidden by default, you need to enable view hidden items on the Ribbon menu (View -> select “Hidden Items”) option to view the folder. establishing-secure-connection-delete-conflicting-comodo-files That’s all there is to do and you’ve successfully solved Establishing Secure Connection error in your Chrome browser. Just restart your system and you are good to go. The thing is, when I reinstalled the Comodo Firewall, it did not create both the DLL file and the files related to certificates. So, I suspect that the files that are causing issues with the Chrome browser are related to an older version of Comodo Firewall. Related: A complete List Of All Chrome URLs and Their Purposes Hopefully that helps and do comment below sharing your thoughts and experiences about this Establishing Secure Connection error in Google Chrome.

How to Force Download Files from Google Drive

0
Force Download from Google Drive – Google Drive is only second to Dropbox and you can easily upload and share files using the awesome cloud storage service. In Google Drive, you can pretty much upload and share almost any and all sorts of files. Moreover, you can collaborate with your team members on editing and modify these uploaded files. That being said, Just like in Dropbox, there is no easy way to download files or docs from Google Drive as it can pretty easily handle most of the common file types and displays or renders them directly in your browser. Though this is convenient in most cases, this may be a pain if you want people to download your files instead of viewing them right in their browser. So if you ever want to download files from Google drive, here is a simple tip to force Google Drive to let users download the file instead of rendering them inside the browser. Related: How to Remote Upload Files to Google Drive

Force Download Files From Google Drive

1. To make this trick happen, all you have to do is change the URL structure of the shared file. 2. For instance, the below URL is a PDF document of Windows 8 shortcuts that we published earlier. If you follow the link below, Google Drive will automatically render and display the PDF document in your browser (if your browser is supported) rather than letting you download it.
https://drive.google.com/file/d/0B2A0jdfON9Y6UGsxWWM5MXRiQ1E/edit?usp=sharing
Force Download Files from Google Drive - Copy ID
Force Download Files from Google Drive – Copy ID
3. Now, to force download the file from the Google Drive, all you have to do is to copy the “file ID” from the above URL and paste it in the below URL format.
https://drive.google.com/uc?export=download&id=FILE_ID
4. Once you have pasted the file ID, the final URL will look something like the below one. Now if you follow the link, the file starts to download instead of rendering inside your browser.
https://drive.google.com/uc?export=download&id=0B2A0jdfON9Y6UGsxWWM5MXRiQ1E
Force Download Files from Google Drive - Enter New URL
Force Download Files from Google Drive – Enter New URL
That’s all there is to do and it is that simple to force download files from Google Drive. Related: How to See the Number of Files in a Google Drive Folder Hopefully, that helps and do comment below sharing your thoughts and experiences about using this simple tip to force download file from Google Drive.

11 Best Dark Themes for Google Chrome to Join Dark Side

0
Dark themes for Chrome – The best thing about Google Chrome is its simple and minimal design and a plethora of extensions to add additional functionality and get the work done. Though Google Chrome looks minimal with its straightforward design, you can actually add your own Chrome themes to make it look different. Of all the thousands of Chrome themes, the black or dark Chrome themes looks really nice and reduce eye strain in dad to day browsing activities. So, here are some of the best and top dark themes for Google Chrome browser. Related: How to Enable Dark Mode in Windows 10

Best Dark Chrome Themes

Below are some of the best dark themes for Google Chrome.

Install Dark Theme on Chrome

In case you don’t know how to install dark theme on Chrome, just click on the theme name to open the official theme page. Once opened, click on the button “Add to Chrome“. That’s it, Chrome will download the dark theme and automatically installs it for you. The change is instant, you don’t have to restart your browser.

1. Material Deep Black Theme

If you are looking for a pure black and white theme then Material Deep Black Theme is for you. It stays simple and is very pleasing to your eyes.
Dark themes for Google Chrome - Material Deep Black Theme
Dark theme Chrome – Material Deep Black Theme
Related: How to Enable YouTube Dark Mode

2. Material Dark (MKBHD Inspired)

A dark material theme for your browser. Every aspect of this theme has been tested so that it always looks crispy. As you can tell from the name itself, the theme is inspired by MKBHD, a famous techie, and YouTube content creator.
Dark themes for Google Chrome - Material Dark (MKBHD Inspired)
Chrome dark theme – Material Dark (MKBHD Inspired)

3. Morpheon Dark

This a black theme at it’s simplest, without distracting branding, backgrounds, images, or logos. Works at with resolutions in Linux, OSX, Windows, and Chrome OS. If you are looking for a simple pure black theme then Morpheon Dark is for you.
Dark themes for Google Chrome - Morpheon Dark
Dark theme for Google Chrome – Morpheon Dark

4. Dark Theme v3

Dark Theme V3 is not a pure dark theme but is very pleasing to your eyes with its minimal look. Moreover, the theme is optimized for 4K resolution. So, you don’t have to worry about how the theme looks if you have higher resolution monitor.
Dark themes for Google Chrome - Dark Theme v3
Dark themes for Chrome – Dark Theme v3

5. Material Incognito Dark Theme

A theme that adds the dark Incognito Mode color scheme to the normal mode of Chrome. With the release of Material Design in Google Chrome, Incognito mode uses a dark color scheme to distinguish it from normal mode. This theme imitates that color scheme and applies it throughout the whole browser.
Dark themes for Google Chrome - Material Incognito Dark Theme
Dark themes for Google Chrome – Material Incognito Dark Theme

6. Black carbon

For lovers of minimalism. Simple but at the same time stylish theme that will allow you without straining the eyes, work or relax in the network.
Dark themes for Google Chrome - Black carbon
Dark themes Chrome – Black carbon

7. Dark Horizon

A plain and dark theme for Chrome. No bright colors, fancy gradients, noisy images, or distasteful color combinations. Nope, if you want that, you’ll have to go elsewhere. Instead, you’ll find something that closely resembles the default theme for chrome, but in a darker shade.
Dark themes for Google Chrome - Dark Horizon
Chrome dark themes – Dark Horizon

8. Material Dark

Material Dark is a minimalistic dark material design inspired theme. A dark Material Design inspired theme for Google Chrome, Chromium, and other Chrome variants.
Dark theme for Google Chrome - Material Dark
Dark theme for Google Chrome – Material Dark

9. Chrome Midnight

Darkness, all the time. A dark theme for Google Chrome that is based on my Chrome extension Play Midnight which is a dark theme or customization extension for Google Play Music. I couldn’t find any Chrome themes that I liked, they were all too shiny or distracting.
Dark themes for Google Chrome - Chrome Midnight
Dark theme for Google Chrome – Chrome Midnight

10. Dark Void

Dark Void is a minimalistic black theme. Unlike other themes in this dark themes for Chrome list, Dark Void stays dark even when the windows is not focused.
Dark themes for Google Chrome - Dark Void
Dark themes for Google Chrome – Dark Void

11. Black Wood

As you can tell from the name itself, Black Wood dark theme for chrome uses black wood pattern along with the dark background. This makes it stand out of the other dark themes for chrome while being very pleasant and easy on your eyes.
Dark themes for Google Chrome - Black Wood
Dark theme for Google Chrome – Black Wood
Hope that helps and do comment below sharing your thoughts and experiences about using the above dark themes for Google Chrome.