Here’s how to delete Windows.old folder automatically in Windows 10. When you upgrade to a newer version of Windows 10 or if you’ve installed Windows 10 on top of the previous installation, Windows will automatically create “Windows.old” folder. This folder contains previous Windows installation files and helps you to downgrade to the previous version if you don’t like or just not comfortable with the newer version.
Typically, the “Windows.old” folder takes up anywhere from five to twenty gigabytes in your C: drive or the system installation drive. If you are not going to downgrade then this is nothing but wasted space. If you are using an SSD for your installation drive then this is especially true as most of the SSDs used for system installation drives are around 60GB and 120GB.
Generally, you can delete Windows.old folder manually or using the Disk Cleanup utility. Alternatively, you can also use the new Storage Sense feature in Windows 10 to automatically delete Windows.old folder. Not to say, Microsoft is releasing two new major updates every year. So, enabling this feature is pretty important to save some disk space and avoid the low disk space warnings.
Automatically Delete Previous Windows Installation Files (Windows.old Folder)
To delete previous Windows installation files or the Windows.old folder, you can use the new Storage Sense feature. When using the Storage Sense feature, it will automatically delete the previous Windows installation files 10 days after you upgrade your system. Along with the Windows.old folder, you can also configure Storage Sense to clear temporary files and files in Recycle Bin that are older than 30 days.
1. First of all, open Windows 10 Settings app by pressing the keyboard shortcut Win + I.
2. In the Settings app, navigate to “System” and then “Storage” appearing on the left panel.
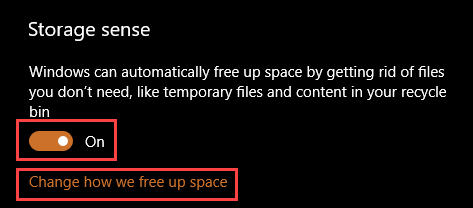
3. Once you open the Storage page in the Settings app, scroll down and toggle the button under “Storage Sense.”

4. After turning on the Storage Sense feature, click on the link “Change how we free up space” to manage how this tool will clear unwanted files.
5. Here in this page, select the checkbox “Delete previous versions of Windows” under the “Free up space now section.”
That’s all there is to do. You’ve successfully configured Storage Sense to automatically delete previous Windows installation files ten days after upgrading your system.
Additional Storage Space Settings
Additionally, you can also make Storage Sense to clean temporary files and recycle bin files older than 30 days. If you would like to use this option then toggle the buttons next to “Delete temporary files that my apps aren’t using” and “Delete files that have been in the recycle bin for over 30 days” and you are good to go.
If you want to clean these files right now then click on the button “Clean new” under “Free up space now” section and Windows will automatically delete the files according to the configuration.
That’s it and hope this tip on how to automatically delete Windows.old folder will help you gain back some lost space. If you like this article then do read how to increase volume above maximum in Windows, very helpful when you are watching videos or listening to songs will low volume.
Comment below sharing your thoughts and experiences about using the Storage Sense feature.
