How to Add Windows Like Taskbar in Ubuntu

If you are a Windows user for a long time and just switched to Ubuntu then the Ubuntu interface may take some time to get adopted. One thing that most Windows users miss in the new Ubuntu unity is the taskbar at the bottom of the screen. This taskbar is very useful as to interact with any opened applications and programs. Sure, Ubuntu has a launcher which acts like a taskbar and where you can also flawlessly pin all the apps you want. But if you miss Windows-like taskbar in Ubuntu, here is how you can add Windows-like taskbar in Ubuntu.

Note: Though I’m showing this tip in Ubuntu 14.04, it should work on any other version of Ubuntu or its derivatives.

Update: Recently checked on Ubuntu 17.10 and the app is still working as it should.

Windows Taskbar in Ubuntu

To add Windows-like taskbar in Ubuntu, all we have to do is to install a tiny app called Tint2. This is a free app, and when installed, Tint2 will add a transparent taskbar to your Ubuntu desktop.

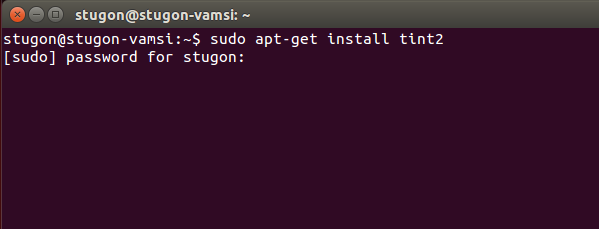
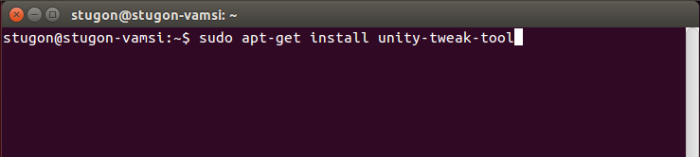
1. Like many things is Ubuntu, you need to install Tint2 via terminal. First off, open the terminal by pressing the keyboard shortcut CTRL + ALT + T. Alternatively, you can search for terminal in the Ubuntu dash/activities.

2. Once you have opened the terminal, copy and paste the following command in terminal and press the Enter button. You may be prompted for sudo password, just type the password and press Enter button to continue.

sudo apt-get install tint2

windows-like-taskbar-in-ubuntu-enter-command

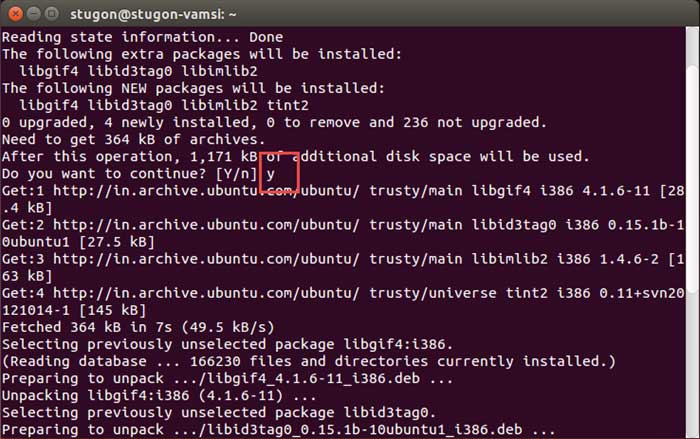
3. As soon as you execute the command, Ubuntu will show the information regarding the downloadable content, space required, and many other things. Just type Y and press Enter button to continue. Once you’ve done that, Ubuntu will download and install Tint2.

windows-like-taskbar-in-ubuntu-enter-yes

4. Once installed, exit the terminal by closing it or by typing the exit command.

5. At this point, you can start using Tint2 by searching for it in the Dash or Activities and opening it.

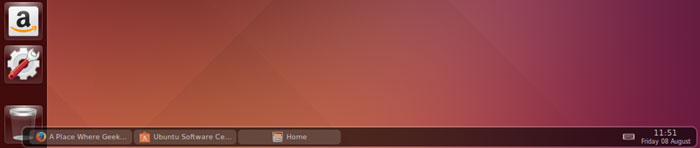
6. As soon as you open the application, you will see a Windows taskbar in Ubuntu. Any window you opened will be added to that taskbar, just like in Windows.

windows-like-taskbar-in-ubuntu-ubuntu-taskbar

Add Tint2 to Startup Applications

However, by default, Tint2 won’t start with your system. You can have to manually launch it.

But seriously, you don’t have to do that each and every time. There is a better way do it. That is, we can add it to the startup applications so that Tint2 automatically starts with your system. No need to manually launch the application when you start your system.

Thankfully, Ubuntu makes it very easy to add startup applications. To add Tint2 to startup applications, open Ubuntu dash or activities by pressing the Win key on your keyboard and search for “Startup Applications” and open it.

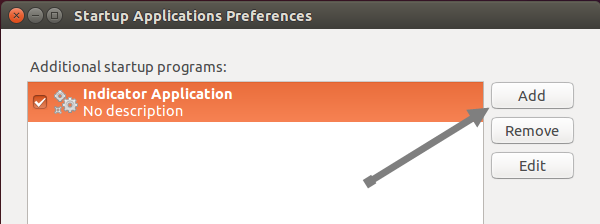
Once the startup applications window is opened, click on the “Add” button to create a new startup application.

windows-like-taskbar-in-ubuntu-click-add-button

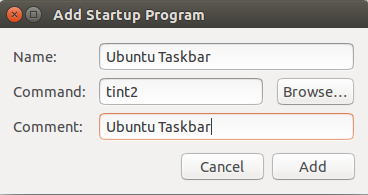
The above action will open up “Add startup program” window. Here enter the command as “tint2” and type the Name and Comment as you like. In my case, I’ve named both name and comment as “Ubuntu Taskbar.”

Once you have done editing, click on the “Add” button to add Tint2 to the startup programs.

windows-like-taskbar-in-ubuntu-add-tint2-startup

After adding, your “Startup Applications Preferences” window should look something like this.

windows-like-taskbar-in-ubuntu-tint2-added

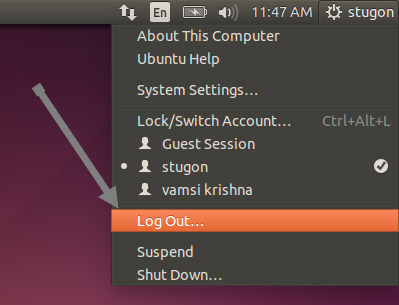
To see the taskbar in action, restart your Ubuntu machine and you should see Windows-like taskbar at the bottom of the screen.

windows-like-taskbar-in-ubuntu-logout

From now on, you can minimize any program to that taskbar just like in Windows.

Hope that helps and do comment below if you face any problems while adding Windows taskbar in Ubuntu.
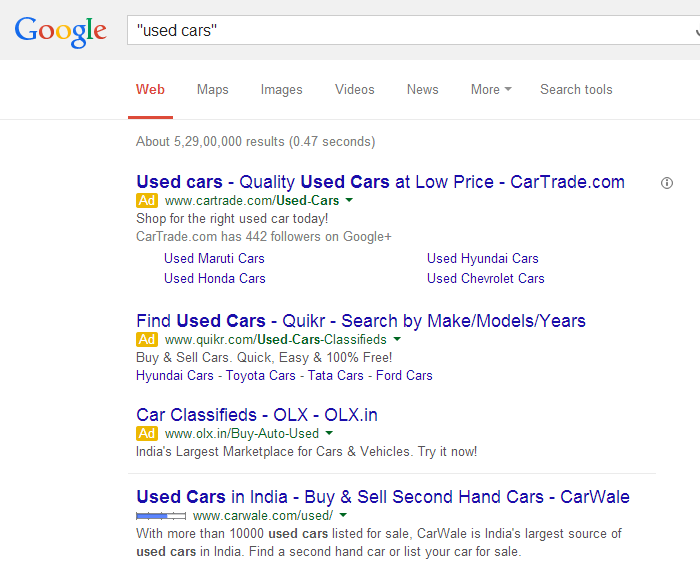
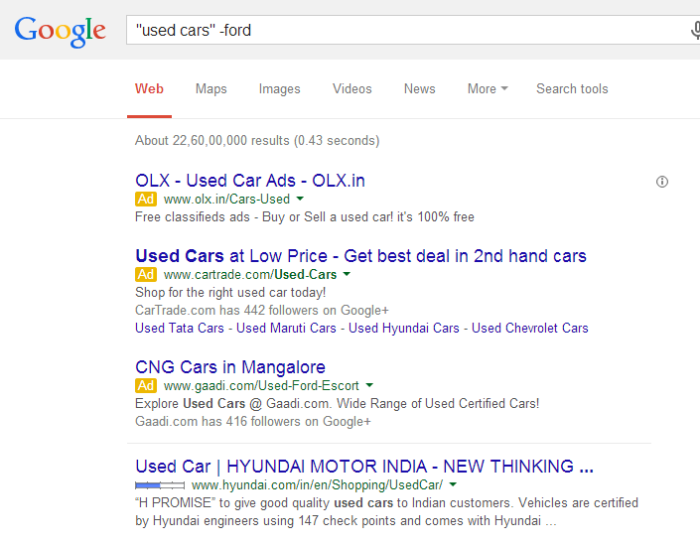
How to Use Google Search Like a Pro [Quick Tips] – Stugon

Google is one of the best ways to find the information you need. In fact, “Google it” are the two words we often hear inside our head whenever we want to find something or find something. Google search engine is pretty powerful and intelligent, but even with this powerful search engine, you won’t get correct answers or search results unless you ask a correct question.

Searching Google smartly saves you time and gives you the results that are most relevant to your search. It doesn’t matter if you are an inexperienced user or a professional, it is always a smart choice to know at least some of the basic search tricks to get things done. So without further ado, let me show you how to use Google search like a pro with these simple Google search tips or rather simple Google search operators.

Note: while I’m focusing on Google search engine, these basic and simple search tips will also work with most of the other search engines out there.

Search Google Like a Pro

Exact Search

Exact word search or exact phrase search is the most basic thing you can do while you are using a search engine. All you have to do is to use quotation marks around your search term. For example, if you are searching for some used cars then you can perform a search something like “used cars.” What this does is that it will force search engines to only show the results that have the word “used” followed by “cars.”

"used cars"

search-google-like-pro-exact-search

Excluding a Word

Whenever you search for something there may be relevant but unwanted results. At times like that, you can exclude a word using the “minus” sign. What this does is that it will tell the search engine that it should ignore those results which have the excluded word. For example, if you are searching for some used cars and there are a bunch of results about “used ford car” and you don’t want a Ford. In those cases, you can use the following search tip.

used cars -ford

search-google-like-pro-exclude-word

Related Words

Sometimes you just want to search for something that is related to what you have in your mind. In those cases, you can search for that by adding “tilde” sign in front of the word. The search looks something like this.

~geek

search-google-like-pro-exclude-word

File Types

There will be times when you want to find a specific file type, like some mp3 or pdf files. In those special cases, you can use file type search operator. Here is a sample of the search.

filetype:pdf ubuntu guide

search-google-like-pro-file-type-search

Calculations and Conversions

Searching for a calculator near your desk for doing some basic arithmetic is just time-consuming. So, why don’t you use Google for that? Along with performing some basic arithmetics, you can even use Google for unit conversions. Here are some examples.

(96*56) / 2

search-google-like-pro-calculator

1 ounce in liters

search-google-like-pro-unit-converter

Using Wildcard

While searching Google, you can use wildcards (*) so that the wildcard can match with any word. This operator is particularly useful for vague searches. For example, you can search for something like “internet * my file” and the Google will match the asterisk (*) symbol with any word. As you can see from the below image, Google used my wildcard entry to insert words like “changed, made, etc”.

internet * my life

search-google-like-pro-wildcard-search

Site Specific Search

Last but not least, the site-specific search is particularly useful if you want to search for something on a specific site. The operator itself is simple. Use the following search.

site:www.stugon.com windows tips

search-google-like-pro-site-search

All the above tips are just basic and there are even more if you want to try. The best part is that you can mix and match or combine all the above tips to search Google like a pro. Not only Google but as I said before, you can use the above tips in almost any popular search engine out there. So how many of these tips you already know and do share your own tips via the comment form below.

So how many of these tips you already know and do share your own tips using the comments section below.

How To Install Unity Tweak Tool In Ubuntu [Quick Tip]

0

Ubuntu 14.04 is quite gorgeous with Unity 7 which is not only fast but has got so many new features and improvements. But like as always, a normal user want to customize the user interface to their likes as to make it a much better place to work.

But tweaking an OS user interface like Ubuntu Unity is much easier than you think, i.e you can use a simple Ubuntu tweak tool. With the help of Unity tweak tool you can do all kinds of basic tweaks without any technical knowledge.

What Is Unity Tweak Tool

Unity tweak tool is a small and open source Unity desktop settings manager which provides an easy and fastest way to customize and tweak Unity desktop to the likes of the user. This tool can help Ubuntu users to access and modify desktop settings without any prior technical knowledge.

Install Unity Tweak Tool In Ubuntu

Installing Unity tweak tool is lot easier than you think and there are two different ways to install Unity tweak tool in Ubuntu. One of the ways is to use the regular Ubuntu software center and the other way is to use the command line.

Install Unity Tweak Tool from Software Center

To install Unity tweak tool using the software center, just launch your Ubuntu software center using Unity dash and search for Unity tweak tool. Once you see the tool in search results, select it and click on the install button to install Unity tweak tool.

install-unity-tweak-tool-1

If you don’t want all this hassle and if you are using Ubuntu right now than just click the below url to automate your work.

Install Unity Tweak Tool

Install Unity Tweak Tools [Command Line]

To install Unity tweak tool using terminal, just launch your terminal using Unity dash and enter the below command and press enter. The terminal may ask your for the password, so enter your account password.

sudo apt-get install unity-tweak-tool

install-unity-tweak-tool-2

Once you press the enter button, Ubuntu will check for all the required pieces and asks for your confirmation. Just enter ‘Y’ and press enter button to continue the installation.

That’s all there is to do and its that simple to install Unity tweak tool in Ubuntu. Hope that helps and do share your thoughts and experiences.

All Essential Google Chrome Keyboard Shortcuts – PDF Download [Free]

0

Making your life a bit easier with keyboard shortcuts is pretty essential because these keyboard shortcuts not only saves your time but increases your productivity by two-fold. Putting that aside, using a mouse for even little tasks like opening a new tab or closing a tab is pretty awkward.

So today stugon is here to share some of the most essential Google Chrome keyboard shortcuts that will not only increase your productivity, but will also makes your browsing experience more awesome.

The below keyboard shortcuts will work with any recent Chrome browser and if you need them for offline usage then you can download all these Google Chrome keyboard shortcuts in PDF using the download link below.

Download Chrome Keyboard Shortcuts PDF

**Also Download**

Shortcuts What They Do
Ctrl + T Open New Tab
Ctrl + N Open New Window
Ctrl + Shift + N Open New Incognito Window
Ctrl + Shift + T Open Last Closed Tab
Ctrl + Tab Switch To Next Tab
Ctrl + Shift + Tab Switch To Previous Tab
Ctrl + P Print Webpage [Chrome Print Dialog Box]
Ctrl + Shift + P Print Webpage [Windows Default Print Dialog Box]
Ctrl + O Open File Dialog Box
Ctrl + S Save Webpage
Ctrl + H Open Chrome’s History Tab
Ctrl + J Open Chrome’s Downloads Tab
Ctrl + F / F3 Open Find Tool
Ctrl + G Find Next
Ctrl + Shift + G Find Previous
Ctrl + D Bookmark Current Webpage
Ctrl + Shift + B Show or Hide Bookmarks Bar
Ctrl + Shift + I Open Chrome’s Developer Tools
Ctrl + Shift + J Open Chrome’s JavaScript Console
Ctrl + Click On A Link Open’s The Link In New Tab [Background]
Ctrl + Shift + Click On A Link Open’s The Link In New Tab [Foreground]
Shift + Click On A Link Open’s The Link In New Window
Ctrl + U View Page Source
Ctrl + R / F5 Reload Current Webpage
Ctrl + F5 Reload Current Webpage Ignoring Cache
Ctrl + + Zoom In
Ctrl + – Zoom Out
Ctrl + 0 Return Zoom To Normal
Ctrl + L Jump To Address Bar
Ctrl + E Enter Search Query In Address Bar
Ctrl + Enter Adds www. & .Com To The Text In Address Bar
Ctrl + 1 through 8 Cycle Through Tabs
Ctrl + 9 Switch To Last Tab
Ctrl + W / Ctrl + F4 Close Current Tab
Shift + ESC Open Chrome’s Task Manager
Shift + Alt + T Set Focus On Toolbar
Shift + F10 Open Context Menu [Similar to Right-Click]
Alt + F Open Chrome’s Settings Menu [Wrench Menu]
Alt + F then B Open Chrome’s Bookmark Manager
Alt + Home Open Homepage
Alt + ← / → Jump To Previous Webpage / Next Webpage
Alt + F4 Close Current Window
Home / End Jump To The Beginning or End Of The Webpage
PageUp or PageDown Scroll Up or Scroll Down
F1 Chrome’s Help Window
F6 Change Focus Between Address Bar and Webpage
F11 Toggle Full Screen
ESC Stop Loading Webpage

Download Chrome Keyboard Shortcuts PDF

How To Disable Auto Media Download Feature In WhatsApp [Android]

0

WhatsApp is one of the most popular mobile messenger app which was recently bought by Facebook for a whole lot of zeros [for $19 Billion]. Mobile users have always loved WhatsApp for its amazing features and dependable secure messaging service.

But like any features, there will be some features that are just annoying or useless under certain circumstances and Auto Media Download Feature is one of them. Auto Media Download feature in WhatsApp is the feature that ensures all the media sent by your buddies is downloaded automatically.

Of course, the feature is optimized by default so that all the media is only downloaded when you are using a Wi-Fi and only images are downloaded while you are using Mobile Data connection. But in some occasions, you may want to disable auto image downloading feature when using mobile data because the images are sucking most of your mobile data or your mobile data is pretty limited.

So to deal with situations like this, here is how you can disable auto media download feature in WhatsApp and how you can manage what media can be downloaded when using Wi-Fi or mobile data.

Disable Auto Media Download Feature In WhatsApp

WhatsApp-messanger

To disable auto media download feature in WhatsApp, Launch your WhatsApp app in your android mobile and touch the menu button and select ‘settings’ from the list.

Now navigate to Chat settings option in the list. Here you will find and bunch of settings, but what we are looking for is ‘Media auto-download’ setting.

Touch/click on it to open it. Here you can see what WhatsApp can download while using mobile data and Wi-Fi. To disable image downloading while using mobile data, just open ‘When using mobile data’ setting and uncheck the check box ‘Image’ and click OK to save the changes.

You can also edit what WhatsApp can do while using Wi-Fi in the same manner. That’s all there is to do and its that simple to disable auto media download feature in WhatsApp.

Hope that helps and do share your thoughts and experiences.

How To Change OneDrive Folder Location In Windows

0

OneDrive is a secure online cloud storage service or you can call it Windows 8.1 cloud storage service provided by Microsoft for easy online file sync and cloud file sharing. Because it is provided by Microsoft and comes pre-installed in Windows 8.1, the OnDrive folder is located on your OS drive. This is sometimes a problem for most of the users because you can’t stuff all your files and folders in your OS drive or you can’t afford to allocate the space required for OneDrive due to smaller hard-drive size (like when using SSD’s).

So no matter what the reason is, here is a simple way to change OneDrive folder location in Windows. Once you relocate the OneDrive folder, you can use that space to install new programs or you can do whatever you want. Of course, if you are using other cloud storage services then you can simply disable OneDrive to save some hard drive space.

Related: Google Drive vs Dropbox – Best Online Cloud Storage Service

Note: though I’m showing this in Windows 8, the same procedure is applicable to Windows 7 and 10.

Change OneDrive Folder Location In Windows

To change OneDrive folder location in windows, launch the Windows file explorer, right-click on the OneDrive icon located under quick navigation pane and select properties from the list.

This action will open OneDrive properties window, here navigate to location tab and click on the Move button to change OneDrive folder location.

change-onedrive-folder-location-1

Clicking on the Move button opens another window where you have to select a location for OneDrive to save files. Once you’ve selected your desired location click Apply button to save changes. In my case, I’ve selected a folder named OneDrive in my F-drive as I have plenty of space to spare in that drive.

change-onedrive-folder-location-2

Note: You may receive a little warning message, just click on the “yes” button to continue.

change-onedrive-folder-location-3

That’s all there is to do and it is that simple to change OneDrive folder location in Windows. From now on, OneDrive will use the new location to save and sync files with OneDrive cloud storage service.

How to Access Linux Partitions From Windows

0

If you are a dual-boot user(Windows and Linux), then at some point of time you may want to access Linux partitions from Windows, but you can’t because Windows can’t handle and won’t support Linux file systems. Which simply means that you just cannot access Linux partitions while using Windows. Actually, that is where these free softwares comes into play.

Most Linux distributions use EXT4 file system and the free softwares listed below are some of the best software’s that can give you the access to this file system so that you can retrieve and work with files and folders seamlessly.

Ways to Access Linux Partitions from Windows

Linux Reader

linux_reader

Linux Reader is a free software from DiskInternals, Linux Reader is most probably the easiest way to access Linux partitions from Windows. You can download this freeware using the download link below and once you’ve downloaded it, just install it like any other software.

To access Linux partitions with Linux Reader, just launch the installed software and it will automatically detects and displays any Linux partitions lying around. As Linux Reader is a Read-Only app, you may have to save files & folders from Linux partitions into your Windows system in order to work with them.

Ext2Explore

ext2read

Ext2Explore is just like Linux reader and is also the other best choice to access Linux partitions from Windows because it is open source and portable i.e, you actually do have to install this app in order to use it. You can download this open source freeware using the download link below.

Once you’ve downloaded the app, just launch it with administrative privileges (right-click on the app and select “Run as administrator” option from the list) to start working with files and folders located in your Linux partition. However, just as with Linux reader, you have to save files & folders into your Windows machine before using/altering them.

That’s all there is to do and its that simple to access Linux partitions from windows. Hope that helps in saving your time with dual-booting.

Top 9 Best Ways To Increase Battery life Of Android Device

0

Android devices are kinda like mini-computers which sometimes are more powerful than our regular notebooks or laptops. Android devices are top-notch and they pack a big bright screen with awesome features, but the catch is that these amazing features of your android smartphone will suck out the last drop of your battery juice.

Though the batteries of your android smartphones are getting bigger, most android users will definitely be happy if their android smartphone’s make it through a day without plugging the charging pin. Android’s are the best smartphones, but that doesn’t mean they are the best at battery management. So here are top 9 best ways to increase battery life of android device.

Ways To Increase Battery life Of Android

Connectivity Features

Android smartphone comes with a host of connectivity features like smartphone wi-fi, Bluetooth, 4G/LTE & mobile network, NFC, GPS, etc. All these connectivity features are pretty useful, but they do drink your battery juice like hell, So it is a good idea to turn off those features when you are not using them. To easily disable these connectivity features you can use an android automation app like tasker or you can use androids built-in power control widget, so place it on the home screen and you can simply toggle them as needed.

turn-off-unused-device-features

AutoSync & Refresing

Most of the apps in android comes with auto-sync and auto-refresh feature. These type of apps are a real burden on your android battery, so do take care of these apps and instead of automatically syncing and refreshing the apps – do it manually or at least enable the auto-sync & auto-refresh features on the apps that you really need. Also always sync your apps on a Wi-Fi connection because it is not only efficient & fast but syncing your apps on mobile network’s data connection drains your battery much faster.

disable-autosync

Uninstall Unnecessary Android Apps

Unnecessary android apps in your smartphone takes a lot of storage space and some apps are pretty resource intensive i.e, they simply drain your smartphone battery for no reason. So to prevent your smartphone from collapsing in mid-day, consider uninstalling each and every unnecessary app. Also don’t just install each and every fancy app you see in the playstore. To pin-point the resource intensive apps you can use Watchdog Task Manager Lite which alerts you when an app is hogging your smartphone’s CPU or taking too much of your storage space.

uninstall-android-apps

Android Location Based Services

To increase your android battery life consider disabling location-based services when you are not using them. These location based services are used by many apps like facebook, google+, twitter, etc.., to triangulate your position using GPS or Wi-Fi & mobile network. So, disabling these location based services can increase your smartphones battery life (also protects your privacy). Usually you can disable these services by navigating to Settings ->Location Services.

android-gps-application

Display Brightness & Live Wallpapers

Android’s bright display and live wallpapers feature is one of the main reason that drains your battery. Sure, live wallpapers are pretty but they put significant stress on your CPU & GPU resources and takes a toll on your phone’s battery life. So, if you can live without eye-candy live wallpapers then do disable them and reduce display brightness when ever you in indoors & at night times. On the other hand, if your android’s display is of OLED or AMOLED then consider using dark themes because the brighter the theme is the more power your screen consumes.

android-screenbrightness

Dump Android Widgets

Android widgets are pretty eye-candy and useful, but just because they are sitting idle on our home screen doesn’t mean they are not sucking out your battery juice. These android widgets (like facebook widget, weather widget, etc) consume a lot of power because they need to fetch fresh content, so they auto-sync and auto-refresh in regular intervals. So, by disabling these types of widgets you can save a lot of battery power. If you just can’t disable all the widgets then be picky about what you use on your home screen.

android-customization

Power Saving Mode

Power saving mode in android smartphone’s is just amazing. If you are using your mobile phone throughout the day then do enable power saving mode as it will do a whole bunch of things like limiting CPU usage, reducing screen brightness, disabling mobile data when phone screen turns-off, etc. Of course, if you want to use your mobile to its fullest (like playing games or watch HD videos) then disable power saving mode otherwise enable it as it saves a lot of precious time and battery juice. You can enable power saving mode by navigating to Settings -> Power Management.

android-power-saving-mode

Use Battery Saving Apps

Battery saving apps are a big help for users who don’t want to go through all the hassle of changing and tweaking settings manually. These battery saving apps are pretty easy to use and make’s all the necessary battery improvement tasks less painful. When it comes to android battery savings apps, Juice Defender is one the best which is solely written to help users save their android battery from draining and degrading.

juice-defender

Go For Rooting (If you know what you are doing)

Rooting is one of the best thing about android. Simply put, rooting is a process where you can get real administrative privileges. By rooting your android device you can effortlessly uninstall all kinds of bloatware and can also underclock and overclock your CPU according to situations which in turn increases your android’s battery life. Needless to say,  rooting enables you to install some of the best and powerful apps which can defend your battery juice and increase productivity. Of course, rooting your android device has its own drawbacks, but the benefits outweigh them.

andriod-root

Conclusion

Adjusting our habits to suite our smartphone’s battery is pretty important as we might just be able squeeze more out of your android battery. Along with the above tips, also follow some basic things like disconnecting the charger as soon as the battery is full, keeping your battery away from hot and warm places, reducing intense usage of mobile phones, etc. So what are your battery saving tips and do share your thoughts on android battery saving stuff.

Top 3 Best Sites To Watch Anime Online Legally

0

Reading the manga and watching anime is really a fun thing to do. As I said in my previous article, it really is a good way to spend some afternoon leisure. As good as it is, it is not that easy to find a good website to watch anime online. Sure, there are tons of sites where you can watch anime in no so legal way, but watching anime legally lets you support the creators while watching the anime online in high quality and as soon as it is released in Japan.

The sites shared here are mostly free. i.e, you can watch most of the anime titles for free. However, some anime titles or the most recent episodes might be behind the pay wall. Without further ado, let’s get to now some of the best sites to watch anime online legally.

Best Sites to Watch Anime Online for Free

We’ve tried our best to give you some of the best legal sites to watch anime online for free. But please remember that some of these sites may restrict you from watching the anime based on your region (due to license restrictions) or your subscription status. In those cases, try using a VPN service to mask your location.

1. Crunchyroll

Watch Anime Online - Crunchyroll
Watch Anime Online – Crunchyroll

Crunchyroll is one of my favorite and best service available to watch anime online. Crunchyroll has hundreds of good anime titles like Naruto, Bleach, etc. Although you can’t watch most recent episodes as they release (you may have to wait for 1 or 2 weeks after their initial release to watch new episodes for free) without a premium subscription, you can watch all the previous or old episodes for free and most of the anime titles here can be accessed worldwide.

So if you don’t mind little things like waiting for new episodes then Crunchyroll is for you where you can enjoy high-quality streaming for free.

2. Funimation

Watch Anime Online - Funimation
Watch Anime Online – Funimation

Funimation is the biggest company that deals with anime in the North America. Funimation hosts several anime titles with almost 8500+ episodes and movies. The best part of Funimation is that you can watch most of the anime titles for free, but the only downside is that you have to be a registered user and there are plenty of regional restrictions in place. However, If you live in the US then you can watch almost all the anime titles.

3. Viki

Watch Anime Online - Viki
Watch Anime Online – Viki

Viki is a beast and does have lots of anime titles to watch. The good thing about Viki is that it is worldwide i.e, Unlike Funimation, the regional restrictions are pretty less and you can watch almost any anime for free. The only downside is that the quality of the free video is a bit low. So, if you don’t mind a little low quality of the video then Viki is that best choice.

Watch Anime Online for Free Conclusion

If you are in the US then you have plenty of other choices like Crackle, Hulu, Netflix, Viz, etc. If you are not the US then you can simply use a paid VPN (which is best for streaming video) or a free VPN to get access to those amazing anime titles.

If you are not in a mood for all this then you can use not so legal anime sites. So these are some of the best sites to watch anime online legally and I do think that I’ve missed some other best sites. So do share if you know any.

Best Places To Find Free Header Images For Your New Twitter Profile

0

Twitter recently announced their new profile design which is 3-columned and modern. The new twitter profile re-design consists of a big and very visible header image which makes it an important part of your twitter page as you can use it to express yourself or your business.

This new and big header images will give plenty of opportunities to show off your skills, but unfortunately, not everyone is a photographer or a creative designer. So to help you with your new found twitter header dilemma we are sharing some of the best places to find free header images for your new twitter profile.

Note: The recommended twitter header image size is 1500 X 500 pixels.

Free Header Images For Twitter Profile

TwitterCovers

free-twitter-header-images-twittercovers

TwitterCovers is always an amazing place to find some of the best twitter header images. TwitterCovers currently hosts hundreds of new twitter headers which are not only amazing, but are also free to use. The interesting part of using TwitterCovers is that when you click on a header image, it will take you into preview mode where you can see how it will look like on your twitter page.

If you like how your header image looks like then you can set that image as your twitter header image just by pressing ‘Set as your Twitter Cover’ button. Of course, you have to give TwitterCovers the permission to access your twitter profile in order to set your favorite image as your twitter cover.

Once you have finished setting up your twitter header image, you can simply revoke access (if you want to) to TwitterCovers just by navigating to Settings -> Apps.

Twitter’s Official Offerings

free-twitter-header-images-twitterflickr

Besides introducing a new design, twitter is also offering some of the best twitter header images to boost up the usage of said space. As of writing this, twitter’s official flickr page has 30+ header images to choose from. I know its not much but twitter’s official flickr page is a good place to start with.

Free Stock Photo Sites

unsplash-free-stock-photo
Free Stock Photo From Unsplash.com

If you want to go a bit creative and want to find your own creative twitter header image then free stock photo sites are the best place to get one. Free stock photo sites give you plenty of space & high quality photos to choose from and customize. So if you don’t mind a little bit of customizations (like cropping and stretching) to your favorite stock photo then you can find plenty of photos which are in par with your taste.