How to Turn on System Restore in Windows 10

0

System Restore is one of the important features that should be enabled on any Windows system. In case you don’t know, System Restore is a simple Windows feature that can roll back your system to a known good state in case of any system corruption.

Generally, System Restore points are created whenever you are doing major tasks like installing programs, install updates, performing certain admin tasks, etc. This automatic System Restore point will help you to roll back if something bad happens to your system due to the changed settings or installed updates or software.

But for some reason, the System Restore feature is disabled by default in Windows 10. So, here is how you can enable or turn on System Restore in Windows 10.

Turn on System Restore in Windows 10

1. Turning on the System Restore feature in Windows 10 is pretty easy and straight forward. To start off, press “Win + X.” This action will open the Power User menu. Here, select the option “System” from the list of options.

ffmpeg-system

2. The above action will open the Settings panel. Here, scroll down and select the option “System Info” under Related Settings category. This action will open the System window. Now, click on the link “Advanced System Settings” appearing on the left sidebar.

Tip: Alternatively, you can search for “Advanced System Settings” in the start menu.

win10-system-restore-advanced-system-protection

3. Once the System Properties window has been opened, select the tab “System Protection.” Here, select the C drive from the list of drives under “Protection settings” and click on the button “Configure.”

win10-system-restore-system-protection

4. The above action will open the System Restore settings window. Here, select the radio button “Turn on system protection.” Under “Disk Space Usage” section, you can configure how much disk space is used by System Restore feature. Just slide the bar to set the disk space.

5. Once you are done, click on the button “Ok” to save the changes.

win10-system-restore-turn-on

6. That’s all there is to do. With this, you have successfully enabled or turned on the System Restore in Windows 10.

Create System Restore Point in Windows 10

1. After enabling the System Restore feature in Windows 10, it is a good thing to create a System Restore point so that you can rollback in future. To create a System Restore point, select the C drive from the list and click on the button “Create.”

win10-system-restore-create-restore-point

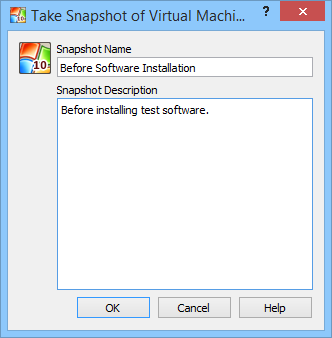
2. The above action will open the System Protection window. Here, enter a good description and click on the button “Create” to create the system restore point. The description helps you differentiate the system restore point among others in future.

win10-system-restore-enter-description

3. As soon as you click on the button, Windows starts creating the System Restore point.

win10-system-restore-creating-restore-point

4. Once completed, you will get the success message just like the below one.

win10-system-restore-created

That’s all for now and hopefully that helps. Do comment below sharing your thoughts and experiences about enabling System Restore feature in Windows.

How to Combine Downloaded YouTube Video and Audio Files Using FFmpeg

0

No matter how you look at it, YouTube is one place where you can find almost any video you want and is also a place for many creative folks that do a lot of crazy things. That being said, downloading videos from YouTube is nothing new.

In fact, there are many software and online services that help you in downloading the YouTube videos. You can even download entire YouTube playlists if you want to. But in recent times, YouTube changed how they deliver videos to you. That is, YouTube now delivers video and audio in separate streams. So when you try to download, audio and video files are downloaded separately in M4A and Mp4 formats respectively. In order to watch the downloaded YouTube video, you need to merge or combine the downloaded video and audio files.

So, if you ever need, here is how you can combine downloaded YouTube video and audio files using FFmpeg.

Installing and Configuring FFmpeg

Merging or combining downloaded YouTube video and audio files is pretty simple and straightforward. Even though there are several programs that can be used for this purpose, we are going to use FFmpeg as it is an open-source and very powerful application.

For Windows 10 follow this: Install FFmpeg in Windows 10

1. To start off, head over to the official website and download the latest build according to your system architecture (32 or 64 bit.). In my case, I’m downloading the 64-bit version.

Note: to find your system architecture, search for “System” in the start menu and open it. Here, you can see your system architecture next to “System type” under the “System” category.

ffmpeg-download-ffmpeg

2. Once you’ve downloaded, open the file using 7-Zip or other equivalent software and copy the folder inside it to the C drive. Once copied, rename the folder to “ffmpeg“. The name change will make it easier to deal with.

ffmpeg-copu-ffmpeg

3. The next thing to do is add FFmpeg to Windows path using “System Variables”. To do that, press Win + X and select the option “System.” If you are using, Windows 7, you can search for it in the start menu.

ffmpeg-system

4. In the System panel, click on the link “Advanced System Settings” appearing on the left sidebar.

ffmpeg-advanced-system-settings

5. The above action will open the System Properties window. Here, click on the button “Environment Variables.”

ffmpeg-environmental-variable

6. In the Environmental Variables window, select the variable “Path” under System Variables and click on the button “Edit.”

ffmpeg-select-path-variable

7. Now, enter the path C:\ffmpeg\bin at the end of the line in the “Variable Value” field. Don’t forget to separate the paths with ;. If you’ve stored the FFmpeg folder somewhere other than the C drive then change the path accordingly.

ffmpeg-add-path

Merge Downloaded YouTube Video and Audio Files

8. After completing the installation procedure, go ahead and download your favorite YouTube video. As you can see, I’m using the KeepVid service to download the YouTube video. As I said before, the audio and video files are displayed separately. Just download the audio and video files.

ffmpeg-download-files

9. For instance, I’m downloading the 480P video file in MP4 format and the audio in M4A format. Make sure the downloaded files have same file names. In my case, the file names are “videoplayback.mp4” and “videoplayback.m4a.”

ffmpeg-downloaded-files

10. Once the files have been downloaded, open the Downloads folder. Here, right-click while holding the Shift key and select the option “Open Command window here.” On Windows 10, you will see the PowerShell option. That will work too.

ffmpeg-open-cmd-here

11. Once the Command Prompt(or PowerShell) window has been opened, copy the below command, paste it and press the enter button to execute the command.

ffmpeg -i videoplayback.mp4 -i videoplayback.m4a -c:v copy -c:a copy output.mp4

ffmpeg-enter-command

12. Once the command has been executed, FFmpeg will merge or combine both the files and saves it in the same folder with the name “output.mp4.”

ffmpeg-command-executed-successfully

13. If you open the Downloads folder again, you can find the new file “output.mp4.” If you want to change the output file name, then you can do that by simply changing output.mp4 part in the above command.

ffmpeg-files-combined

That’s all there is to do. As you can see, it is really simple to combine downloaded YouTube videos using FFmpeg.

Hope that helps. Do comment below sharing your thoughts and experiences about using FFmpeg to combine downloaded YouTube videos.

Image credits: Christiaan Colen

Fix: VMware Authorization Service not Running Error in Windows

0

VMware is one of the best virtualization software that is very easy to use while being filled with a range of features like snapshots, shared VM’s, virtual machine cloning, etc. In fact, I’ve already published a bunch of articles related to VMware and installing operating systems in it.

As useful as the software is, you may sometimes receive “VMware Authorization Service not Running” error blocking you from accessing or using the installed virtual machines. The message itself is cryptic and won’t tell you much.

vmware-authorization-service-not-running-error

In case you are wondering, the error is nothing but VMware is letting your know that its authorization service is not running. By default, the authorization service will start automatically with your Windows system. But sometimes the service may stop running or you might have disabled it from running at the system startup.

Authorization service is an important part of VMware and in either case, you won’t be able to access your virtual machine.

So if you ever need, here is how to fix VMware authorization service not running in your Windows system.

Fix VMware Authorization Service not Running Error

1. Fixing Vmware Authorization Service not Running error is pretty easy, All you have to do is start the Authorization Service. To do that, press “Win + R,” type services.msc and press the enter button. Alternatively, you can also search for in the start menu.

vmware-authorization-service-not-running-services-run-command

2. The above action will open the Windows Services app. Here, find the service “VMware Authorization Service.”

vmware-authorization-service-not-running-find-vmware-auth-service

3. Now, right-click on it and select the option “Start.” This action will start the service and you can now access all your virtual machines.

vmware-authorization-service-not-running-select-start

4. If you don’t want to manually set it every time, you can make the service start automatically at every system startup, which is its default behavior. To do that, right-click on the service again and select the option “Properties.”

vmware-authorization-service-not-running-select-properties

5. The above action will open the VMware Authorization Service Properties window. Here, select the option “Automatic” from the drop-down menu next to “Startup Type” and click on the “Ok” button to save the changes.

vmware-authorization-service-not-running-select-automatic

That’s all there is to do and from this point forward you won’t receive this error.

Alternate Method to Fix VMware Authorization Service not Running

However, if you don’t have time to mess with services and stuff, then you can easily start VMware temporarily by running it as an administrator.

1. To do that, right-click on the VMware icon on your desktop and select the option “Run as Administrator.” You can also do that in the start menu.

vmware-authorization-service-not-running-vmware-run-as-administrator

2. That’s all for now and hopefully this simple fix will help you solve the error VMware Authorization Service not running.

Do comment below sharing your thoughts and experiences about using the above methods to fix VMware Authorization Service not running error in Windows.

How to Automatically Redirect Bing Searches to Google in Chrome While Using Cortana

0

Windows 10 is out for over a week now and I’m pretty much enjoying the conversations and help from Cortana, a personal digital assistant in Windows 10. Whenever Cortana searches the web for you, it automatically open the Bing search engine in your default browser.

This is one of the most unliked things as most of us know how infamous Bing is while phrasing the search results.If you don’t like Bing or just want well-phrased search results from Google, then you can easily redirect those Bing search quires to Google in your Chrome browser.

Redirect Bing Searches to Google in Chrome

To redirect Bing searches to Google in your Chrome browser, we need to install a free chrome extension called Chrometana. To install the extension, head over to the URL and click on the button “Add to Chrome.” This action will automatically download and install the Chrome extension.

chrometana-install-extension

The good thing about this free extension is that it supports two other search engines along with Google, namely, Yahoo, and DuckDuckGo, a search engine that respects your privacy.

As soon as you install the extension, it will display the Options page where you can select the search engine you want the searches to redirect. In my case, I’m selecting “Google” as my search engine.

chrometana-select-google

From this point forward, any time a search is made through Bing it will be redirected to Google or the search engine that you’ve selected in the options page. To test it, open the Bing website and search for something.

chrometana-search-bing

As you can see, the search is automatically redirected to Google. So, even when Cortana opens the Bing search engine, those searches will be automatically redirected to Google.

chrometana-search-redirected-to-google

If you ever want to change the search engine, you can do so by accessing the Chrometana options page. To open the options page, click on the menu icon and select “More Tools” and then “Extensions.” Alternatively, you can also enter the URL chrome://extensions/ in the address bar.

chrometana-select-extensions

Once you are in the Extensions page, find the Chrometana extensions and click on the link “Options” to open the options page and you can easily change the default search engine by simply selecting the logo.

chrometana-select-options

That’s all there is to do and it is that simple to redirect all Bing searches to Google in Chrome while using Cortana. Moreover, you might be interested in this awesome Google Chrome easter egg.

Hopefully that helps and do comment below sharing your thoughts and experiences about using the above extensions to redirect Bing searches to Google in Chrome while using Cortana.

How to Enable Click to Play for Plugins in Chrome, Firefox and Internet Explorer

Whenever you visit a website on the internet, most browsers start to display and play all the multimedia content like flash, audio, video, etc. This feature of automatically playing any and all the multimedia content on a website is not a good thing at times as they are susceptible to vulnerabilities and may potentially leak user information. One workaround for this is to completely disable all the flash elements on a page, but this approach is just limited to flash. Moreover, completely disabling the Flash may pose hard time if you want to access Flash content.

To deal with this problem, most modern browsers have an inbuilt feature called Click-to-play. When enabled, click-to-play can restrict your browser from automatically playing any multimedia content and plugins. If you want to play the content, you need to manually click on that respective placeholder. This simple feature is very helpful when you want to conserve your bandwidth or just to improve your online security. In case you are wondering, here is how you can enable click-to-play for plugins in Chrome, Firefox and Internet Explorer.

Enable Click-to-play in Chrome

Enabling click-to-play in Chrome is pretty straightforward. First off, click on the Menu icon located in the upper right corner and select “Settings” from the list of options.

click-to-play-chrome-settings

Once you are in the settings panel, scroll down and click on the link “Show advanced settings” to expand the advanced settings.

click-to-play-chrome-advanced-settings

Here, click on the button “Content settings” under the Privacy section.

click-to-play-chrome-content-settings

The above action will open the Content settings. Here scroll down and select the radio button “Click to play” under Plugins section to enable the click-to-play feature in Chrome. Once you are done with the changes, click on the “Done” button to save the changes.

click-to-play-chrome-select-radio-button

That’s all there is to do and if you have any exceptions to this rule, you can manage those exceptions by clicking on the “Manage Exceptions” button. Moreover, since the Opera browser is based on Chrome, the same procedure is applicable to the Opera browser.

Enable Click-to-play in Firefox

The good thing about the Firefox browser is that the click-to-play feature is enabled by default. But the bad thing is that any flash content can easily bypass this restriction. If you think that the click-to-play feature is disabled in your Firefox browser, enter “about:config” into the Firefox address bar and press the enter button.

click-to-play-firefox-about-config

This action will open the Firefox Configurations page.If you receive some warning message like the below one, just press the button “I’ll be careful, I promise” to continue.

click-to-play-warning-message

Now enter “click_to_play” into the search bar to narrow down the results. If the value of the preference name “plugins.click_to_play” is set to “true” then you don’t have to change anything as the click-to-play feature is already enabled.

click-to-play-firefox-default-setting

If the value is not set to “true,” you can easily change it by either double clicking on the preference name or by right-clicking and selecting the option “Toggle.”

click-to-play-firefox-change-setting

Moreover, if you want to enable click-to-play for Flash content then you might need to use third-party add-on’s like FlashBlock.

Enable Click-to-play in Internet Explorer

Enabling click-to-play in Internet Explorer is also easy but is a bit different from other browsers. First off, click on the Settings icon (gear icon) appearing on the upper right corner and select “Manage Add-ons” from the list of options.

click-to-play-ie-mange-addons

The above action will open the Manage Add-ons window. Here, select “Toolbars and Extensions” in the left pane. Now search for “Shockwave Flash” in the right pane, right-click on it and select the option “More information.”

click-to-play-ie-more-information

This action will open up the More Information window. In this window, click on the button “Remove all sites” and close the Window.

click-to-play-ie-remove-all-sites

That’s all there is to do. You have successfully enabled click-to-play for Flash in Internet Explorer.

Hopefully that helps and do comment below sharing your thoughts about enabling click-to-play in Chrome, Firefox and Internet Explorer browsers.

How to Create and Restore Snapshots in VirtualBox

0

It is a known fact that the virtual machines are infinitely flexible with their feature sets. Besides from all the features that VirtualBox has to offer, the ability to take snapshots of your current virtual machine is one of the best features as it enables you to quickly restore your virtual machine to known good state. Snapshot in VirtualBox is kinda like a restoration point but saves all the current configurations or settings, and software installed on a virtual machine. Whenever you restore a snapshot, VirtualBox simply overwrites the current state with the snapshot.

Since the Snapshot feature in VirtualBox can easily restore your virtual machine, it will be a huge time saver whenever you are trying to do a bunch of stuff like experimenting new software or settings, using legacy systems like Windows XP, etc. Unlike in previous versions, VirtualBox improved the Snapshot feature and here is how you can create and restore snapshots in VirtualBox as required.

Create Snapshots in VirtualBox

Creating a snapshot in VirtualBox is fairly simple and straight forward. First off, turn on your virtual machine by selecting the virtual machine on the main screen and clicking on the “Start” button.

virtualbox-start-virtual-machine

Once the machine has been started, select the option “Machine” in the top menu and again select the option “Take Snapshot.” Alternatively, you can use the keyboard shortcut “Host + T.”

Note: by default, the Host key is the Right Ctrl on your keyboard. If needed, you can change the default host key in the VirtualBox preferences.

virtualbox-take-snapshot

The above action will open “Take snapshot of virtual machine” window. Here enter the relevant snapshot name and description so that you can easily identify the said snapshot in the future. Once entered, click on the “Ok” button to continue.

virtualbox-snapshot-name-description

As a result of the above action, VirtualBox starts creating the snapshot of your virtual machine.

virtualbox-snapshot-creation-progress

Once the snapshot has been created, you can access it from the main window by clicking on the “Snapshots” button. By default, VirtualBox stores all your snapshots in the virtual machine folder itself.

virtualbox-number-of-snapshots

Moreover, you can create as many snapshots as you need and the VirtualBox displays the number of snapshots next to the button itself.

Restore Snapshot in VirtualBox

To restore a snapshot in the VirtualBox, click on the “Snapshots” button located on the upper right corner of the home screen. This action displays all the available snapshots in a nice tree view.

virtualbox-snapshots

The good thing about this is that you can restore any snapshot of your requirement without disturbing the other snapshots in the tree. Now to restore a snapshot, right click on the snapshot name and select the option “Restore Snapshot.” Alternatively, you can also press the keyboard shortcut “Ctrl + Shift + R.”

virtualbox-restore-snapshot

The above action will open a confirmation window. Here click on the “Ok” button to restore the selected snapshot. If you don’t want to automatically create a snapshot of the current state, deselect the checkbox “Create a snapshot of the current machine state.”

virtualbox-restore-confirm

If you want to know more details of a snapshot, right-click on the snapshot and select the option “Show details.”

virtualbox-show-details
The above action will pop-up the details window where you can find all the details of the selected snapshot like the base memory, system configuration, name, description, etc.

virtualbox-snapshot-details

That’s all there is to do and it is that easy to create and restore snapshots in VirtualBox.

Hopefully that helps and do comment below sharing your thoughts and experiences about using the snapshots feature in the VirtualBox software.

How To Create Portable VirtualBox To Carry Virtual Machines With You

0

VirtualBox is one of the best software that ease out requirement for creating virtual environments for different purposes like testing, researching, and for common daily use. Though installing and using VirtualBox on your local computer is easy, it would be a good thing to install it right in your USB drive so that you can carry your virtual machines where ever you go. That way, you don’t have to lose your virtual environment and can easily use your favorite operating system in public places without compromising the security. Creating portable VirtualBox isn’t hard, here is how you can install VirtualBox in your USB drive.

Creating Portable VirtualBox

Creating a portable variant of the official VirtualBox is really easy than you think it is. First off, head over to the Portable-VirtualBox website and download the installer. Once downloaded, execute the downloaded file. Since the executable is self-extracting, select he location of the extraction (like your pen drive) and click on the “Extract” button. For instance, I’ve selected “Programs” folder located on the C:\ drive.

portable-virtualbox-extract-archive

Note: It is recommended that you select the location carefully as this is where you are going to install the Portable VirtualBox. Of course, you can move the files if needed, but it is still better to choose a correct location before hand.

Once extracted, open the location in your Windows File Explorer and launch the application “Portable-VirtualBox.exe.”

portable-virtualbox-open-executable

After launching the Portable VirtualBox application, select the language of your choice and click on the “Ok” button to continue the installation.

portable-virtualbox-select-language

The above action will open the “Extract and/or compress” window. Here, click on the “Download Installation Files of VirtualBox” button. If you have already downloaded the VirtualBox installation file from the VirtualBox official site, then enter the path of that downloaded file by clicking on the “Search” button. But the recommended way is letting the Portable VitualBox download the required files.

portable-virtualbox-download-status

As soon as you click on the download button, you will see the status info at the bottom of the window. The download may take time to complete depending upon the internet connection speed. Once the download is complete, select the either of the check boxes “Extract the files for a 32-bit system” or “Extract the files for a 64-bit system” and click on the “Ok” button. For instance, I’ve selected the 64-bit checkbox as my Windows machine is based on 64-bit architect,

portable-virtualbox-32-or-64-bit

Once the extraction has been completed, navigate to the Portable VirtualBox folder again and double-click on the “Portable-VirtualBox.exe” file.

portable-virtualbox-launch-application

This time, the above action will launch the VirtualBox application. From this point forward, you can create and manage all your virtual machines using the portable VirtualBox. If you ever want to change the VirtualBox settings, you can do so using the native “VirtualBox Settings” option.

portable-virtualbox-launched

While the VirtualBox is running, Portable VirtualBox application will sit silently in your taskbar. If you want to change how Portable VirtualBox functions, simply right-click on the taskbar icon and select the option “Settings.” Alternatively, you can press the keyboard shortcut “Ctrl + 5.”

portable-virtualbox-taskbar-icon

Portable VirtualBox contains all sorts of essential settings like the HotKey Settings, USB Settings, Network Settings, etc. So, change the settings as required and click on the “Save” button to save the changes. That being said, only change the settings if you know what you are doing as the application just works without any manual intervention.

portable-virtualbox-settings

That’s all there is to do and it is that easy to install VirtualBox portably. Even though I have installed portable VirtualBox locally on my computer, you can  always install it in your thumb drive so that you can have your own virtual machines on the go.

Hopefully that helps and do comment below if you face any problems while installing the Portable VirtualBox or just to share your thoughts and experiences on using this free software.

How to Install VMware Tools manually in Ubuntu

0

VMware Player or Workstation makes it easy to create and manage a virtual environment out of the box. In the virtual environment, you can pretty much install any operating system like Windows, Linux or Mac OS. Even though the installation of a guest operating system takes just a few clicks, you need to install VMware Tools. Installing VMware Tools enables you to have decent graphics and to use some of the advanced VMware functions like shared folders, drag and drop support, etc.

Sure, VMware automates the process with the click of a button, but there will be times when you need to install or update VMware tools manually. If you are wondering, here is how you can install VMware Tools manually in Ubuntu.

Note: this manual installation method works with any Ubuntu derivatives and the procedure is also same for all the Linux variants. The commands may vary, though.

Install VMware Tools manually

1. The first thing you need to do is to update your Ubuntu guest OS to find and install any possible updates and the updated Linux headers. To do that, open up the Ubuntu terminal by pressing CTRL + ALT + T and execute the below command.

sudo apt-get update && sudo apt-get install build-essential linux-headers-$(uname -r)

2. Once you are done updating and installing the Linux headers, navigate the VM tab on the virtual machine and select the option “Install VMware Tools.” This action will insert the VMware tools ISO into the virtual CD or DVD drive. In fact, if you navigate to the media folder, you will see the contents of the inserted virtual disk.

install-vmware-tools-iso-contents

3. Now extract the contents of the disk to a temp folder. To do that, execute the following command by opening the terminal (CTRL + ALT + T).

tar -xvf /media/$USER/"VMware Tools" /VMwareTools*.gz -C /tmp

install-vmware-tools-extract-command

4. Once extracted, enter and execute the below command to commence the installation procedure.

sudo /tmp/vmware-tools-distrib/vmware-install.pl -d

install-vmware-tools-install-command

As soon as you press the enter button, Ubuntu starts installing VMware Tools as instructed. Once completed, you will see a screen something like the below one. After installing VMware tools, don’t forget to restart your virtual machine to make the changes take effect.

install-vmware-tools-install-finished

That’s all there is to do and hopefully that helps. Do comment below sharing your thoughts and experiences about using the above method to install VMware Tools in Ubuntu and other derivatives.

5 Advanced VirtualBox Tricks Every User Should Know

0

VirtualBox is one of the best free virtualization software which allows you to install a virtualized operating system within a host operating system. When compared to other virtualization solutions, Virtualbox is lightweight, fast and packed with a whole lot of features. Check out these advanced VirtualBox tricks (or features) and get the most out of this software.

Note: The features shown here require you to have “VirtualBox Guest additions” installed in your guest operating system.

1. VM Snapshots

The best thing about VirtualBox is that you can effortlessly take snapshots of the current state of your virtual machine so that you can revert back to that saved state at any point of time. This snapshots feature is particularly useful when you are doing something like installing a new software, configuring new settings, dealing with suspicious files, etc. With the snapshots, you don’t have to backup or reinstall the guest operating system over and over again.

To create a snapshot in the VirtualBox, navigate to “Machine” and then select “Take snapshot” option from the menu.

virtualbox-features-take-snapshot

This will open “Take snapshot” window, enter the name and description of the snapshot and click on the OK button. That’s all there is to do, VirtualBox took a snapshot of the current state of your guest operating system.

2. VM cloning

VirtualBox cloning feature enables you to clone the selected guest operating system so that you can easily use that exact copy with other VirtualBox hosts. VirtualBox cloning is particularly useful when you want a second instance of that same operating system or when you want to distribute an OS with set configurations. In older versions of VirtualBox, you need to use the command line to create clones, but now the option is built into the GUI.

To create a clone of your guest operating system, right click on the guest operating system you want to clone and select the option “Clone.”

virtualbox-features-clone-guest-os

This action will open another window. Enter the name of your guest clone and click on the “Next” button to continue.

virtualbox-features-enter-clone-name

Select the radio button “Full clone” and click on the button “Clone” to start cloning the selected guest operating system.

virtualbox-features-select-full-clone

3. Seamless Mode

Seamless mode is one of the interesting feature’s using which you can visually combine your guest operating system and the host operating system. For instance, if you are running Lubuntu guest operating system on a Windows 8 PC, then it would be something like this when seamless mode is enabaled.

virtualbox-features-select-seamless-mode

As you can see from the above image, the guest operating system window is vanished and it seems as if we are running on the host operating system. But still, all your guest operating system programs are sandboxed and the VirtualBox is running in the background.

To activate the seamless mode, open your guest operating system, navigate to “View” and select “Switch to seamless mode” option. If you want to switch back to the normal mode, use the shortcut “Host + L.”

virtualbox-features-seamless-mode

Note: By default, the “Host” key in VirtualBox is set to “Right Ctrl” key on your keyboard.

4. Shared Folders

VirtualBox enables users to share folders between guest and host operating system using network file sharing feature inside the virtual machine. To enable shared folders, right click on the virtual machine and select “Settings.” Now navigate to the share folders tab and create a new share folder by clicking on that little “+” icon. That’s all there is to do to create a shared folder in VirtualBox.

virtualbox-features-shared-folders

5. Drag and Drop

Quickly sharing files and folders between guest and host operating systems is some times difficult even if you are using shared folders. To eliminate this problem, VirtualBox introduced drag and drop support using which you can simply drag and drop files and folders between guest and host operating systems.

To enable the drag and drop feature, right click on the guest operating system and select “settings” from the options. Here in this window, switch to “Advanced” and select “Bidirectional” option under drag and drop. That’s all there is to do. Moreover, you can also enable sharing of the clipboard using the option “Shared Clipboard.”

virtualbox-features-drag-and-drop

Conclusion

The tips shared here are not only easy to follow but are very helpful for any VirtualBox user. That being said, do experiment with different options in VirtualBox to get most out of this amazing free software.

Hopefully that helps and if you think I missed any other interesting VirtualBox feature, then share it using the comment form below.

Awesome and Stunning HD Dragonflies Wallpaper Collection [Hand Picked]

0

Dragonflies are wondrous creatures, they are beautiful and colorful. They are the master of air and just watching these gentle creatures at evenings makes us a little happier. The most amazing thing about Dragonflies is that they can travel at a speed of 22 – 34 miles per hour, and certain types of Dragonflies (Southern Giant Darner) can have a flight speed of 60 miles per hour. So, if you are a nature lover or if you just can’t resist the beautifulness of these Dragonflies then why don’t you decorate your screens with the awesome and stunning Dragonflies wallpaper collection.

As you know we’ve already shared a bunch of beautiful and inspiring wallpaper collections, So be sure to check them out. As this is an HD collection, some wallpapers are pretty huge exceeding 2 MB in size, so it takes some time to load depending on your internet connection speed.

Please do note that, all the wallpapers here are in no particular order, So check out all the wallpapers for maximum return. Now, each wallpaper can be downloaded individually by clicking on the wallpaper and if you wish to download them as a pack, you can do so using the download link.

Note: Also note that these wallpapers may vary in size, so you may have to crop or stretch to fit your screen.

Download Dragonflies Wallpaper Collection

dragonflies-wallpapers-stugon (1) dragonflies-wallpapers-stugon (2) dragonflies-wallpapers-stugon (3) dragonflies-wallpapers-stugon (4) dragonflies-wallpapers-stugon (5) dragonflies-wallpapers-stugon (6) dragonflies-wallpapers-stugon (7) dragonflies-wallpapers-stugon (8) dragonflies-wallpapers-stugon (9) dragonflies-wallpapers-stugon (10) dragonflies-wallpapers-stugon (11) dragonflies-wallpapers-stugon (12) dragonflies-wallpapers-stugon (13) dragonflies-wallpapers-stugon (14)

Download Dragonflies Wallpaper Collection