25+ Exotic & Awesome Car Wallpapers [HD Edition]

0

Are you feeling like speedy today??? Have a dream of driving exotic sports car??? Then just rev up those dreams with all these awesome & exotic high speed cars, give your desktop screen some fuel-filled adrenaline taste by adding these exotic wallpapers.

So what are you waiting for? Just jump in the driver seat and have a ride with our exotic & awesome car wallpapers collection of 2013. Each wallpaper can be downloaded individually by clicking on the wallpaper and/or if you wish to download them as a pack, you can do so using the download link.

Note: Also note that these wallpapers may vary in size, so you may have to crop or stretch to fit your screen.

Download Exotic Car Wallpapers Pack

Car Wallpapers

Exotic-Car-Wallpapers-HD-Edition-stugon.com (1)
Exotic-Car-Wallpapers-HD-Edition-stugon.com (26)
Exotic-Car-Wallpapers-HD-Edition-stugon.com (25)
Exotic-Car-Wallpapers-HD-Edition-stugon.com (24)
Exotic-Car-Wallpapers-HD-Edition-stugon.com (23)
Exotic-Car-Wallpapers-HD-Edition-stugon.com (22)
Exotic-Car-Wallpapers-HD-Edition-stugon.com (21)
Exotic-Car-Wallpapers-HD-Edition-stugon.com (20)
Exotic-Car-Wallpapers-HD-Edition-stugon.com (19)
Exotic-Car-Wallpapers-HD-Edition-stugon.com (18)
Exotic-Car-Wallpapers-HD-Edition-stugon.com (17)
Exotic-Car-Wallpapers-HD-Edition-stugon.com (16)
Exotic-Car-Wallpapers-HD-Edition-stugon.com (15)
Exotic-Car-Wallpapers-HD-Edition-stugon.com (14)
Exotic-Car-Wallpapers-HD-Edition-stugon.com (13)
Exotic-Car-Wallpapers-HD-Edition-stugon.com (12)
Exotic-Car-Wallpapers-HD-Edition-stugon.com (11)
Exotic-Car-Wallpapers-HD-Edition-stugon.com (10)
Exotic-Car-Wallpapers-HD-Edition-stugon.com (9)
Exotic-Car-Wallpapers-HD-Edition-stugon.com (8)
Exotic-Car-Wallpapers-HD-Edition-stugon.com (7)
Exotic-Car-Wallpapers-HD-Edition-stugon.com (6)
Exotic-Car-Wallpapers-HD-Edition-stugon.com (5)
Exotic-Car-Wallpapers-HD-Edition-stugon.com (4)
Exotic-Car-Wallpapers-HD-Edition-stugon.com (3)
Exotic-Car-Wallpapers-HD-Edition-stugon.com (2)

Download Exotic Car Wallpapers Pack

5 Best & Useful Indicator Applets For Ubuntu

0

Indicator applets for ubuntu are pretty useful and they come in handy when needed and there is no doubt that you’ll love the flexibility and usability they provide in daily life. So, today stugon shares some of the best & useful indicator applets for your ubuntu machines.

Actually, this list is not limited in anyway as there are lots of awesome applets and Its a hard time for me to choose just five of them. Also, please note that some of the app indicators may not be available in ubuntu official repositories and you may have to search & launch the app from dash after the installation.

Useful Indicator Applets For Ubuntu

System Load Monitor

This applet lets you monitor your system performance on your unity panel itself. It has the ability to show your CPU activity in a graph style and it can show more than one resource type at the same time. To do that, all you have to do is to tweak the preferences. To install it, follow the command below..

multi-load-indicator

sudo apt-get install indicator-multiload

Classic Menu

If you are tired of using dash, then you can get the old GNOME-2 style classic menu on your unity panel. This is pretty handy if you love to have all your programs at your mouse pointer. Use the commands below to install classic menu indicator.

classic-menu-indicator-ubuntu

sudo apt-add-repository ppa:diesch/testing 
sudo apt-get update 
sudo apt-get install classicmenu-indicator

Recent Notifications

Oops, you missed a notification from ubuntu as you are away form your machine!!! No problem, you can tackel this using the recent notifications indicator. This indicator helps you view all your notifications that pass through the notification daemon. Use the command below to install recent notifications indicator.

sudo add-apt-repository ppa:jconti/recent-notifications 
sudo apt-get update 
sudo apt-get install indicator-notifications

Hardware Sensors

This is one of my most favourite, This app is capable of showing the information regarding your hardware stuff like temperature & fan speed, etc. Use the commands below to install hardware sensors indicator.

sudo add-apt-repository ppa:alexmurray/indicator-sensors 
sudo apt-get update 
sudo apt-get install indicator-sensors

Weather Indicator

Last but not least, Weather indicator provides you with the latest and updated weather information right on your ubuntu unity panel. To install weather indicator use the commands below.

weather-indicator-ubuntu

sudo apt-get install indicator-weather

Note: If the above command doesn’t work for you then you can use the alternate ppa to installe weather indicator.

sudo add-apt-repository ppa:weather-indicator-team/ppa 
sudo apt-get update 
sudo apt-get install indicator-weather

That’s all there is guys, If you think I missed any awesome indicator apps then share it via comments.

How To Use Google Authenticator On Your PC

0

To make the online and offline accounts more secure most of the web apps and websites are offering an extra layer of protection which is called as two-step authentication. Most of the two-step authentication procedures support time-based code generation apps like Google Authenticator which can be used with your smartphones or tablets.

Here in this simple how to we will see how to use Google authenticator on your PC, so that you don’t always have to depend on your mobile phone or tablet.

Use Google Authenticator On Your PC

While Google officially produces apps for Android, iOS, BlackBerry & Windows Phone, Other developers have also created the implementation of Google Authenticator that can be used on your PC. To make Google Authenticator work on your windows PC all you have to do is to download and install a small app called Gauth4Win.

After installing, Launch the application from start menu> It may produce some .NET error, just ignore it and hit continue, It should just work fine.

After launching, It will appear on your system try. Right-click and hit ‘modify key’ to enter the key. After that, you can right-click and select copy to copy the produced time-based authentication key to your clipboard.

google-authneticator-on-pc

Mind Limitations

By far, Using Google Authenticator on your PC is less secure as anyone who has the access to your PC can simply copy the code to use it without out permission and there is also the threat of keyloggers which may steal your precious key codes and passwords.

The above app only supports one account at any give point of time. Also bare in mind that these apps are not officially supported by Google. However, the algorithm used by Google is an open standard which is in-turn used by these kind of apps.

From now on you can use this two-step authentication to secure your online or offline accounts like Dropbox, Lastpass etc.

Fully Manage Your Android Phone From PC – Wondershare MobileGo for Android Review

0

Managing your android mobile from your PC is never easy, with MobileGo for android you can do it with ease and confidence as it provides all most all the latest and most useful tools to do so. To make it simple, Wondershare MobileGo for Android is an all in one application which makes managing your mobile more simple yet elegant. This is a Mobile Go review on how well does it perform what it says.

Jump To: Intro | Features | Pros | Cons | Pricing | System Requirements | Conclusion

Introduction

MobileGo for android is a pretty smart application which makes your android management simpler. MobileGo offers almost all the features you’ll ever need like the ability to back up mobile contacts, messages, apps, audio, video, etc. It comes with other smart tools which can transfer your contacts or music or videos from and to your PC.

To get started, All you have to do is to download and install Wondershare’s Mobile Go for Android on your PC and connect your mobile phone to it. You can connect your android phone using the regular USB cable or Wi-Fi. If you wish to connect your mobile phone using Wi-Fi you need to install free MobileGo app in your Smartphone which is available for free in Play Store.

Wondershare-MobileGo-for-Android-1

After connecting, MobileGo instantly detected my Xperia and installed all the required drives and stuff. Within a moment it displayed an overview of all the content in my mobile on its left panel and the right-bottom panel has the most used tools like back up & Contact’s manager.

It really took me out that I can actually back up all the contacts, music, videos, apps, etc.., with just two clicks and with another two clicks I was ready to import iTunes and other music files.

Wondershare-MobileGo-for-Android-2

With MobileGo, transferring music and videos to your mobiles is just as breeze and it just took me 15-min to convert & transfer my video files from PC to mobile.

By clicking on ‘More Tools’ button at the bottom of the home screen you can bring up a hole bunch of other tools to find duplicate contents, import & export music, One-click backup & restore, etc.

Features

  • One-click backup and Restore to easily secure your mobile data.
  • Transfer multimedia files easily and MobileGo will make sure that they are compatible with your device by converting them on the fly.
  • Transfer and edit your contacts with no hassle.
  • Organize your apps seamlessly, You can install, uninstall & create a backup with just one click.
  • Send, Read & Manage your SMS from your desktop using MobileGo.
  • MobileGo can easily handle your mobile calls when connected to it.
  • Just one-click to download your favorite apps and videos from play store and YouTube directly to your mobile phone.

Pros

  • Minimal and user friendly UI.
  • No-nonsense features like one-click backup and restore.
  • Can import your iTunes from your PC to your android mobile.
  • Can seamlessly manage your text messages.
  • Free online resources to integrate your mobile.
  • Free high-quality customer support.
  • Money back guarantee if you are not satisfied.

Cons

  • No free version available as of now.
  • No support of Linux distributions.
  • Need to have separate license if you have a MAC.

Pricing

As we said before there is no free version of MobileGo but they offer a trial version by which you can test if it works for you or not. The premium version is currently priced at $39.95 and it gives the best bang for your buck.

System Requirements

System requirements of MobileGo are pretty low and standard, I mean you can run it seamlessly on your old PC’s too.

  • Operating System: Windows 8/7/XP/2003/Vista
  • Processor: 750MHz Intel or above, or AMD CPU
  • Free Hard Disk Space: 200 MB or more
  • RAM: 256 MB or above

As per the mobile support/requirements, MobileGo supports a wide variety of models like Samsung, Nexus, Sony, Motorola, etc.. For more details you can visit this page.

Download WonderShare MobileGo For Android

Conclusion

MobileGo for android an a full-fledged application you which can manage your android mobile without any hassle. There are other products which can manage your android mobiles but they are pretty messy and may also fail from time to time. So, MobileGo for android can give you the best bang for your buck.

Windows Run Dialog & Windows Most Useful Run Commands

0

The windows Run dialog box is pretty handy to quickly access the control panel items like administrative tools, etc. It can also be used to launch almost anything like programs, folders, documents without any jumping, hoping and clicking. Said that, windows run dialog is much neglected windows feature by its users.

So, here is a quick round up on how to use run dialog in windows and also highlights some of the most useful run commands which can be used to manage your PC hassle free.

How To Open Run Dialog Box

The most simple way to open the run dialog in windows is to press WIN + R. If you want to go a long way then you can find it in the start menu by simply typing Run or if you are using windows 8.1 then simply find Run in the power menu which pops-up when you right-click on the start button [again press WIN + X to access power menu].

Most Useful Run Commands

windows-run-command

The list below is not limited in anyway, there are literally too many run commands you can play with and I’m only sharing some of the most used and useful run commands.

  • shutdown or logoff – Use these commands to shutdown or logoff your PC, To restart use shutdown -r.
  • taskmgr – Opens Task Manager.
  • desk.cpl – Opens windows display properties.
  • {application name} – Just type in the name of the application to open it[ex: photoshop], Provided that the application supports the shortcut.
  • appwiz.cpl – Opens Add/Remove Programs.
  • cleanmgr – Launch disk clean up utility.
  • %appdata% – Opens application data folder.
  • %HomePath% – Opens users home folder.
  • %UserProfile% – Opens users profile.
  • %ProgramFiles% – Can use to open program files folder.
  • control netconnections or ncpa.cpl – Opens network connections.
  • control – Opens control panel.
  • control admintools – Opens windows administrative tools.

There are other well know commands like MSCONFIG, CMD, Services.msc, etc.., which can be used to launch the appropriate application. So, next time when you are tying to open some program or folder try to use Run dialog box, It would be fun.

Stugon Explains: Linux Directory Structure

Six years back when I first used Linux I’m like ‘I don’t like Linux’, well this is because I just can’t stand all those alien named folders & I can’t see my C, D, E, F drives, I can’t find add remove programs, no command prompt,  etc. But the thing is, Everything takes time to adopt so I just sat before my windows machine surfed through the internet, learned a bit and really started to love Linux based OS Ubuntu & here I am. So, this article is for beginners who are pretty new and are willing to know more about Linux Directory Structure.

Linux and Unix file system is defined by ‘Filesystem Hierarchy Standard(FHS)’, If you are a complete windows user and are a newcomer to Linux based OS like Ubuntu or Fedora then the Linux directory structure may look alien with all those cryptic named folders.

In this article we will go into great detail explaining the file system structure of Linux. For this particular post we will be using Ubuntu as the base and even if you are using another Linux based OS, the file system will mostly be similar to Ubuntu, So no worries.
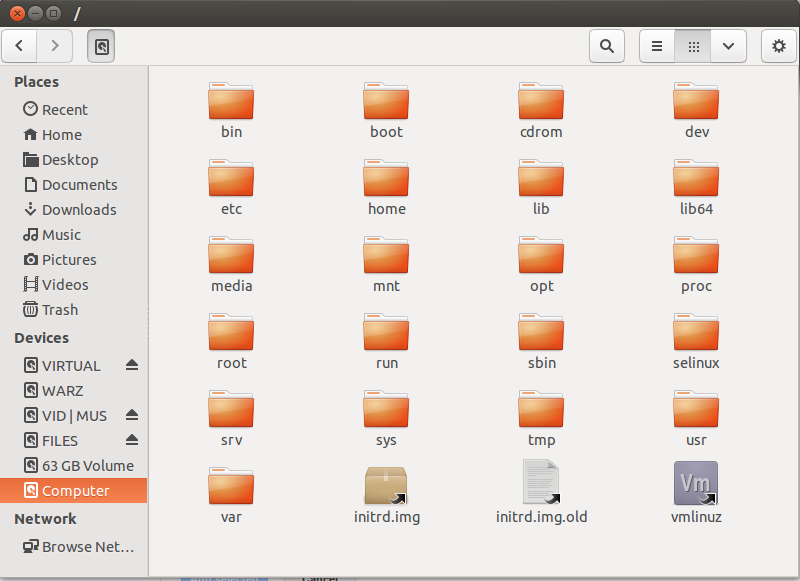
Linux-Filesystem-Hierarchy-Standared

/
This is the root directory of your Linux box, typically everything goes from here. This is something like C drive of your windows machine.

/bin
/bin directory contains essential user binaries which are required when the system is mounted in single-user-mode. Don’t get this confused with ‘/usr/bin’ where user specific applications like compiz or firefox are stored.

/boot
The name says it, Here the static files like GRUB and Linux kernels required to boot the system are stored.

/cdrom
In simple this is the temporary location for CD-ROMs inserted into your system.

/dev
The /dev directory contains all the device files. In the Linux world, everything is seen as files and folders including your hardware. For example you can find your hard drive under ‘/dev/sda’ and CD-ROM under ‘/dev/cdrom’, etc.

This drive not only contains physical devices but also contains virtual pseudo-devices.

/etc
/Etch contains system wide configuration files which can be edited using a simple text editor. It does not contain user specific configuration files as they are situated under each user’s home directory.

/home
The /home directory contains the home folder of each user. Each user has write permission to his/her folder only and must obtain elevated permission to modify system files.

Each users home folder contains user-specific-config files and data files.

/lib
The /lib directory contains library files which are used by the binaries in /bin and /sbin directories.

/media
The /media directory contains sub folders of mounted removable media. For example, if you insert some USB stick or CD-ROM then you can see a folder mounted automatically in /media directory.

/mnt
Simply speaking this is the temporary mounting point for system administrators to mount other file systems like windows.

/opt
This /opt directory is used by propitiatory software packages which doesn’t follow FHS.

/proc
This is the directory which contains files representing system and process information and basically it is very similar to /dev directory.

/root
To be simple, this is the home directory of *root* user. It contains data and config files of root user. Unlike normal users whose home folders are situated in /home/user, Root users have their home folder directly under /root directory.

/run
This /run directory contains application state files which provide applications to store their transient files required, like process ID’s and sockets.

/sbin
This /sbin directory is actually similar to /bin directory but contains system administration binaries which are generally intended to run by the root user.

/selinux
This directory has nothing to do with Ubuntu as Ubuntu doesn’t use SElinux. Actually /selinux is used to store security related files which is also similar to /proc directory. SElinux is used by other Linux distros like Fedora and Red Hat.

/srv
/srv is defined as the directory containing service data.

/tmp
The /tmp directory contains all the temporary files of running applications which are deleted as soon as the application is closed or after some interval.

/usr
The /usr directory contains user binaries and other read only data of specific user and not the system specific binaries or data.

There are other sub folders in /usr directory like /usr/local where locally compiled applications are installed, /usr/bin where non-essential applications are installed, /usr/sbin where non-specific system administration binaries stored.

/var
To be simple this is a writable version of /us (which is read-only) folder which contains variable data files like log files.

Note: Ubuntu may also contain files and folders which are not yet included in FHS.
EX: /cdrom

Download this as PDF file

17+ Stunning Space Wallpapers For Your Exploration

0

Well there Geeks, This is space week for us and we’ve brainstormed to find you the best Hi-Resolution Space Wallpapers. Almost all of us are really eager to know what’s in the space and some geeks are really amazing to find what’s actually space is. So, why not pimp up your geeky desktop screens with these awesome space wallpapers.

All the wallpapers here are Hi-Res, some exceeding 3MB in size per wallpaper. Thanks to all those folks who put their efforts on making these awesome stunning HD space wallpapers.

Each wallpaper can be downloaded individually by clicking on the wallpaper and/or if you wish to download them as a pack, you can do so using the download link.

Note: Also note that these wallpapers may vary in size, so you may have to crop or stretch to fit your screen.

Download Space Wallpapers [33.4 MB]

space-wallpaper-stugon.com (1)
space-wallpaper-stugon.com (7)
space-wallpaper-stugon.com (6)
space-wallpaper-stugon.com (5)
space-wallpaper-stugon.com (4)
space-wallpaper-stugon.com (19)
space-wallpaper-stugon.com (18)
space-wallpaper-stugon.com (17)
space-wallpaper-stugon.com (16)
space-wallpaper-stugon.com (15)
space-wallpaper-stugon.com (14)
space-wallpaper-stugon.com (13)
space-wallpaper-stugon.com (12)
space-wallpaper-stugon.com (11)
space-wallpaper-stugon.com (10)
space-wallpaper-stugon.com (9)
space-wallpaper-stugon.com (8)
space-wallpaper-stugon.com (3)
space-wallpaper-stugon.com (2)

Yet Another 20+ Awesome Geek Wallpapers For All Geeks & Nerds

0

Its true the we all love geeks and love to be a geek, So why not spice up your desktop with your passion and interest??? Today, Stugon is sharing yet another 20+ awesome geek wallpapers for all geeks and nerds. Actually, we are amazed on the tremendous response we got from our previous geek wallpaper collection and we are here to share some more to satisfy your appetite for being a geek. So, what are you waiting for??? Spice up your screen with these awesome wallpapers.

Each wallpaper can be downloaded individually by clicking on the wallpaper and/or if you wish to download them as a pack, you can do so using the download like at the bottom of the post.

Note: Also note that these wallpapers may vary in size, so you may have to crop or stretch to fit your screen.

geek-wallpapers-stugon.com-1
geek-wallpapers-stugon.com-21
geek-wallpapers-stugon.com-22
geek-wallpapers-stugon.com-23
geek-wallpapers-stugon.com-24
geek-wallpapers-stugon.com-25
geek-wallpapers-stugon.com-2
geek-wallpapers-stugon.com-3
geek-wallpapers-stugon.com-4
geek-wallpapers-stugon.com-5
geek-wallpapers-stugon.com-6
geek-wallpapers-stugon.com-7
geek-wallpapers-stugon.com-8
geek-wallpapers-stugon.com-9
geek-wallpapers-stugon.com-10
geek-wallpapers-stugon.com-11
geek-wallpapers-stugon.com-12
geek-wallpapers-stugon.com-13
geek-wallpapers-stugon.com-14
geek-wallpapers-stugon.com-15
geek-wallpapers-stugon.com-16
geek-wallpapers-stugon.com-17
geek-wallpapers-stugon.com-18
geek-wallpapers-stugon.com-19
geek-wallpapers-stugon.com-20

Download Geek Wallpaper Pack [7.62 MB]

15+ Ice King Polar Bear HD Wallpaper Pack For Animal Lovers

0

Polar bears are one of the most prominent and cognitive creatures which are on the top of the food chain in polar region. They are extremely intelligent, massive and undeniably beautiful which can weigh between 350kg – 700kg. So why not spice up your screens with these awesome Ice King wallpaper pack???

Stugon today shares some of the most beautiful HD polar bear wallpapers which you can download individually by clicking on the images or you can download the wallpaper pack using the download link below.

Note: These wallpapers may vary in size, so you may have to crop or stretch to fit your screen.

Download Polar Bear HD Wallpaper Pack (6.13MB)

7 Things To Do Before & After Reinstalling Windows – Stugon Checklist

0

For me, reinstalling windows is just tedious task as I always forget some to do things like backing up data & profiles, downloading latest drivers, etc. So today in this DIY, Stugon deals with some important things to do before and after reinstalling windows. All the tips in this check list are just general, and anybody can do it to have a smooth re-installation experience.

Before Beginning Re-installation

1. BackUp, BackUp – Always BackUp

No matter what you do, the first thing to do is to backup all your important stuff to a safe place like on-line cloud storages or to some external hard-drives, because crazy things can happen all the time, we just don’t know when. While reinstalling you have to erase the whole OS installed partition(formally known as C drive), so its a good idea to check and backup folders like My Documents, Downloads, My Pictures, My Videos, My music, etc. Otherwise you may lose your data permanently.

When we say back up, we are talking about everything like all your files and folders, software user profiles, browser bookmarks, saved passwords in browsers, email, address book, etc.

2. Check For Latest Drivers & Download

Doing this may increase smoothness of your system performance after reinstallation, and this is actually a must do thing while upgrading your windows machine like from windows 7 to windows 8. To check for the latest updates and download if any, you can always visit your product manufacturer’s website where you can find all the latest update listings. Some important drivers are listed below…

  • Motherboard and chipset Drivers
  • On board video and graphics drivers
  • Sound-card drivers(If you have any)
  • LAN/Network drivers
  • Touch-pad drivers for laptops

3. Manage Your Partition Sizes

If you are planning to wipe out entire hard-drive, its fine, just re-think of what partition sizes you want them to be while you are reinstalling or after installing windows, Otherwise you may get stuck at a point what you give huge space of your windows installation drive and less for your work/personal drive, which then requires separate work to resize the partitions.

As per my personal experience, I won’t give more than 60-70 GB of space for my C-drive, as I won’t store any kind of files or folders and also won’t install all kind of crazy & useless programs I see in the internet.

After Re-Installation

4. Install Drivers and Latest Software’s

This is the first thing to do after reinstalling your windows, Just head on and install all the drivers that came with your PC or the one you’ve downloaded. By doing so you can actually use the internet and other stuff which helps further.

Also install all the essential software’s you need and before that, to have some basic protection download and install the best free antivirus solution which can protect you from online/offline threats and please do not trust Microsoft Security Essentials.

5. Reconfigure All your Backed Up Data and Personal Settings

Remember the backup you did in step-1??? Just take that and re-pour it into your system and make some time to reconfigure all your personalised settings like user accounts, passwords, cosmetics, power settings, antivirus scan and defrag schedule, etc.

6. Future Restoration Options

As silly it appears, no one wants to install their OS often. So, its a good idea to create some clean restore point and enable previous version in windows by which you can restore any deleted files. How To Geek as discussed greatly on how to enable and use windows previous versions, you can learn so much from that article.

7. Update, Update – Always be Updated

Last but not least, Just configure your internet connection and update to the latest service pack available and install all the latest security patches, this helps you keep protected from grabbing hands. Also check for any latest updates for your favorite software’s as you can’t take any chance with windows, check out why windows is most targeted among hackers.

If you are a laptop owner, here are 4 best tips to increase its life expectancy. I know its kinda funny, but the easiest part of all the process in re-installation is actually installing windows(just point & click).