When you are not using, it is always a good idea to disable the microphone. By disabling the microphone, you can restrict any software or app from spying on your conversions. In case you are wondering, here’s how to disable the microphone in Windows 10.
There are three methods to disable the microphone in Windows 10. I will show all of them, follow the one you are comfortable with.
Method 1: Disable the Microphone Using Windows 10 Settings App
If you want the easiest way to turn off or disable the microphone then you can do that using the Settings app. The good thing about this method is that you can either restrict all the Store apps at once or restrict individual apps from accessing your microphone.
1. To open Windows 10 Settings app, press Win + X and then select “Settings” from the Power User menu.
Note: You can also use the keyboard shortcut Win + I to directly open the Settings app. Here are more Windows 10 shortcuts.
2. In the Settings app, navigate to “Privacy” and then to “Microphone” appearing on the left panel.
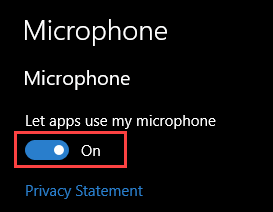
3. On the right panel, toggle the button to Off under “Let apps use my microphone“. That’s it.

If you want to control individual apps then you can do so by scrolling down and toggling the button next to the app.
Method 2: Disable the Microphone Using Control Panel
Alternatively, you can also disable the microphone using the Sound options in the Control Panel.
1. Search for Control Panel in the start menu and open it.
2. In the Control Panel, find and click on the option “Sound“.
3. The above action will open the Sound settings window. Here, navigate to the “Recordings” tab, find the microphone, right-click on it and select the option “Disable“.
That’s it. You’ve disabled the microphone using the Control Panel. If you want to enable the microphone in future, right-click and select “Enable“.
Method 3: Disable the Microphone Using Device Manager
1. To start off, search for Device Manager in the Start menu and open it. Alternatively, you can also open it by typing”devmgmt.msc” in the Run dialog box (Win + R) and pressing the Enter button.
2. In the Device Manager, expand “Audio Inputs and Outputs” section
3. Now, right-click on your microphone and select the option “Disable device“.
If you want to enable microphone, simply select “Enable device” from the right-click menu and you are good to go.
That’s all there is to do and it is that simple to disable microphone in Windows 10. Comment below sharing your thoughts and experiences about using the above methods to disable microphone in Windows.

