Here’s how to to change Time Machine backup frequency for Mac. On a Mac system, Time Machine is one of the best, easiest, and a painless backup tool to properly backup files or even the entire operating system. The good thing about Time Machine is that once configured, it runs silently in the background and backs up everything so that you don’t have to worry about unlikely events that may cause data loss or corruption.
This is all good and very useful. However, when you schedule Time Machine to backup your system, it can be a bit aggressive and runs once every hour to backup files to the target location. As you can tell, unless your data is super important, it can be a bit of nuisance if the backup is running once every hour and taking up the CPU cycles and Disk I/O. This is especially true if you want to use your system to its fullest.
To make matters worse, there is no simple way to change Time Machine backup frequency to meet your needs. But that doesn’t mean you cannot do it. In case you are wondering, here’s how to modify Time Machine backup schedule so it won’t be a pain in the back on a daily basis.
Change Time Machine Backup Frequency
To change Time Machine backup schedule, we are going to use a free and lightweight app called Time Machine Editor. So, head over to the official site, download the software and install it like any other Mac application.
1. After installing, launch Time Machine Editor to start modifying the Time Machine backup schedule.
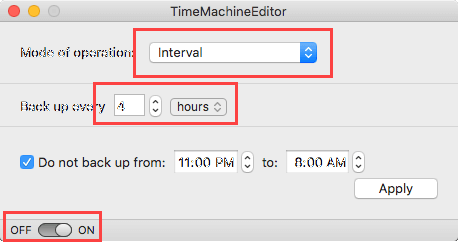
2. As soon as you open the application, you can see that it provides you with three options in the drop-down menu.
- Inactive: When you set this option, the backups are done when you are not using your system. i.e, when your system is inactive.
- Interval: Using this mode, you can configure Time Machine to backup in set intervals. Like every 2 hours, every 4 hours, etc.
- Calendar Intervals: If you would like to be more specific about the Time Machine backup schedule then you can select this option. Using this option, you can schedule backups based on dates, weeks, time, etc.
3. So, select the backup frequency next to “Mode of Operation,” configure additional settings, toggle the button appearing at the bottom of the window to ON and then click on the button “Apply” to save changes.
In my case, I’ve selected mode of operation as “interval” and configured Time Machine to backup once every four hours.

One Thing to Keep in Mind
If you think you no longer need this app to manage or modify Time Machine backup frequency then you need to turn off Time Machine Editor first and then uninstall the app. To do that, open the app and toggle the button appearing at the bottom of the Windows to OFF.
If you uninstall the app without turning it off, the regular Time Machine backup schedule may get conflicted and cause unnecessary problems. However, it is easy to solve. Simply install the Time Machine Editor again, launch it, turn it off, and then uninstall it.
That’s it and it is that simple to change the backup schedule for Mac. Do comment below sharing your thoughts and experiences about using Time Machine Editor to modify Time Machine backup frequency.
