Windows is moving slowly but surely towards using PowerShell as its main terminal. For instance, even Microsoft removed the Command Prompt option from the WinX Power User menu and replaced it with the PowerShell option. Of course, this doesn’t mean that the Command Prompt is becoming irrelevant or going away, it just that the PowerShell is gaining more popularity due to its features and ease of use.
More often than not, most online tutorials and Windows tips you see on the internet requires you to execute some sort of command the PowerShell window. Though most commands execute as they should, some might throw you an error letting you know that you don’t have enough privileges to execute the command.
Run PowerShell as Administrator
In those situations, you need to run PowerShell as administrator. In case you are wondering, here are different ways to run PowerShell as administrator.
1. Using Start Menu
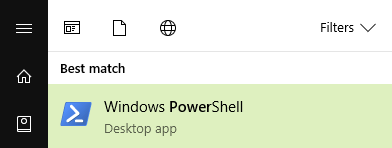
One of the easiest ways to run PowerShell as administrator in Windows is via the Start Menu. To start off, search for PowerShell in the Start Menu.
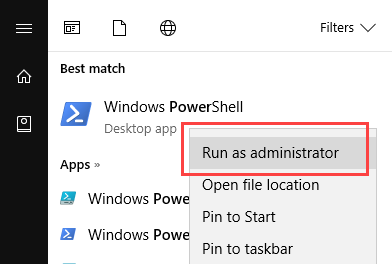
Now, right-click on the PowerShell result and select the option “Run as Administrator.”
You will get a UAC (User Account Control) pop-up requesting for your approval. Simply click on the button “Yes” and the PowerShell will be opened with administrator rights.
2. Using the Power User Menu
The second easiest method is to use the Power User menu or WinX menu. Microsoft added the Power User menu back in Windows 8. The Power User menu is one the best features that gives you quick access to many Windows tools like PowerShell, Disk Management, Device Manager, etc.
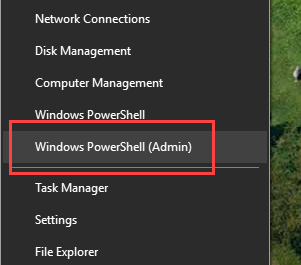
To start off, press the keyboard shortcut “Win + X” or right-click on the start menu to open the Power User menu.
From this menu, select the option “Windows PowerShell (Admin).”
You will get a UAC (User Account Control) pop-up requesting for your approval. Simply click on the button “Yes” and the PowerShell will be opened with administrator rights.
3. Using File Explorer
Just like with many tools and programs, you can open PowerShell with admin rights using the File Explorer. To get started, press “Win + E” to open the File Explorer. Once opened, copy the below path, paste it in the address bar, and press enter button.
C:\Windows\system32\WindowsPowerShell\v1.0\
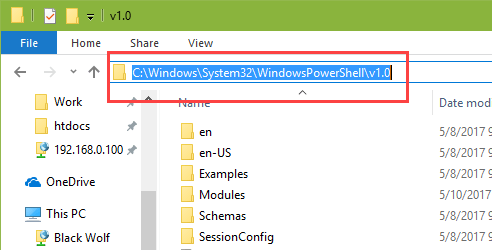
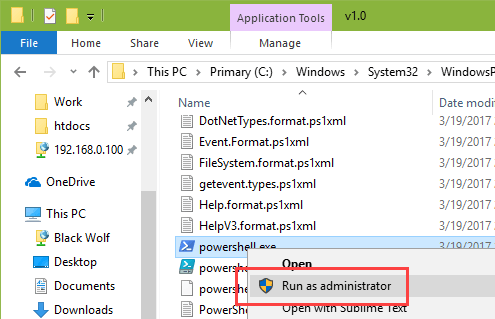
Here in this window, find and right click on the file “PowerShell.exe.” Now, select the option “Run as administrator.”
You will get a UAC (User Account Control) pop-up requesting for your approval. Simply click on the button “Yes” and the PowerShell will be opened with administrator rights.
4. Using Windows Task Manager
Using the task manager to run PowerShell as administrator is a round about way but you can do it if need be. First off, right-click on the taskbar and select the option “Task Manager.”

After opening the task manager, navigate to “File” and select “Run new task.”
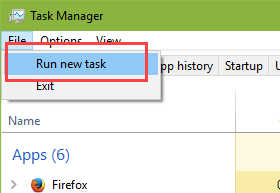
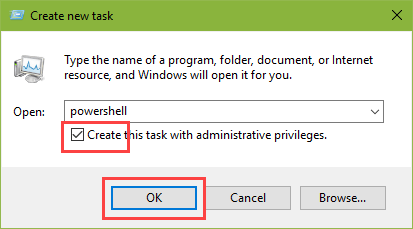
Now, enter “PowerShell” in the blank field, select the check box “Create this task with administrative privileges” and click on the “Ok” button.
You will get a UAC (User Account Control) pop-up requesting for your approval. Simply click on the button “Yes” and the PowerShell will be opened with administrator rights.
That’s it. Do comment below sharing your thoughts and experiences about using the above methods to run PowerShell as admin in Windows.

